Create Custom Workers


This guide covers how to create workers for any available service — whether it is a default service such as the OBD manager, or a custom one you have built yourself. It begins with an overview of what workers are and how they function, then walks through a practical example: creating a worker that continuously fetches OBD data and saves it to a file.
Workers
A worker is a process executed by a manager according to a defined workflow. Each workflow consists of a series of ordered steps that produce a desired output.
Creating a Worker
Start by selecting the appropriate manager for your use case. For example, use obd_manager to read OBD data, or ec2x_manager to execute AT commands not implemented by default.
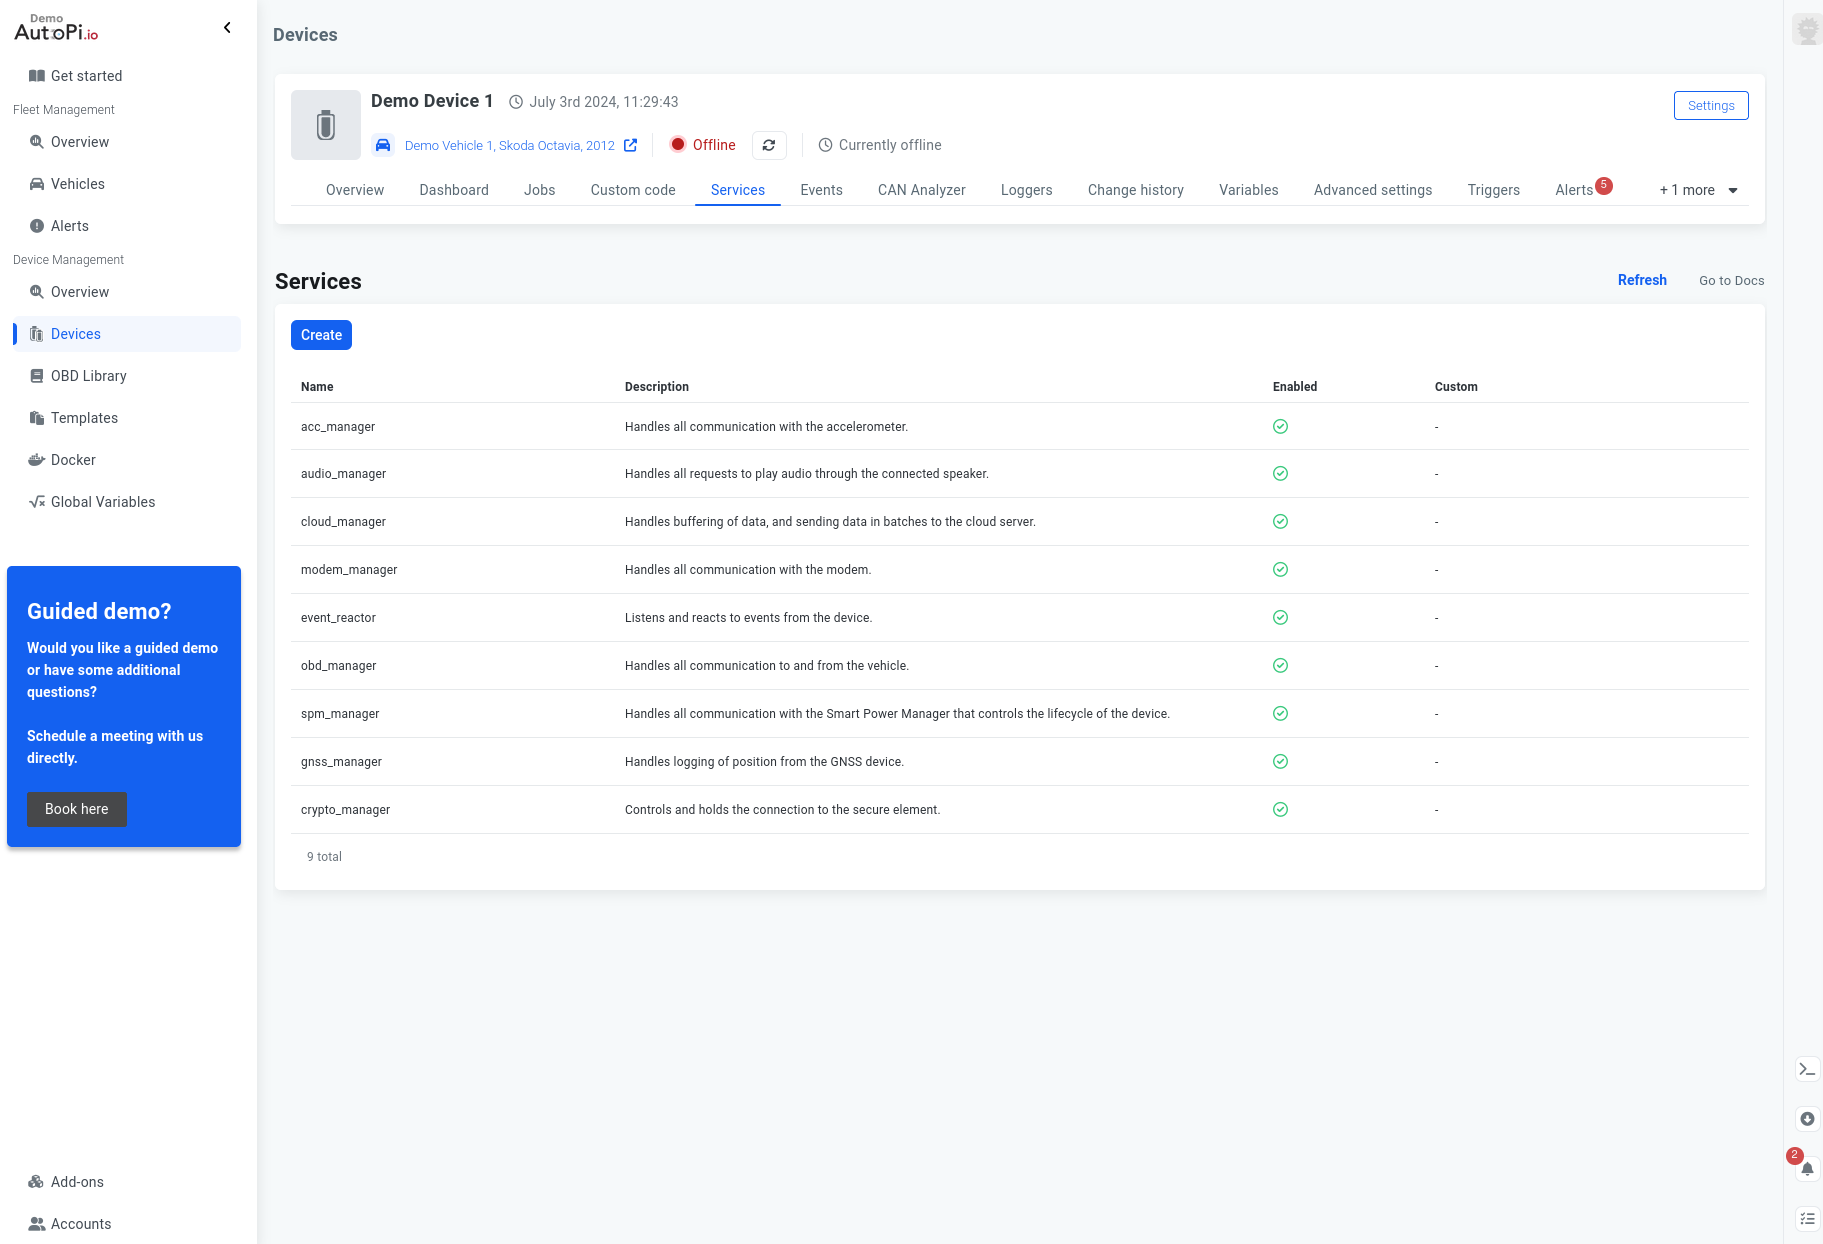
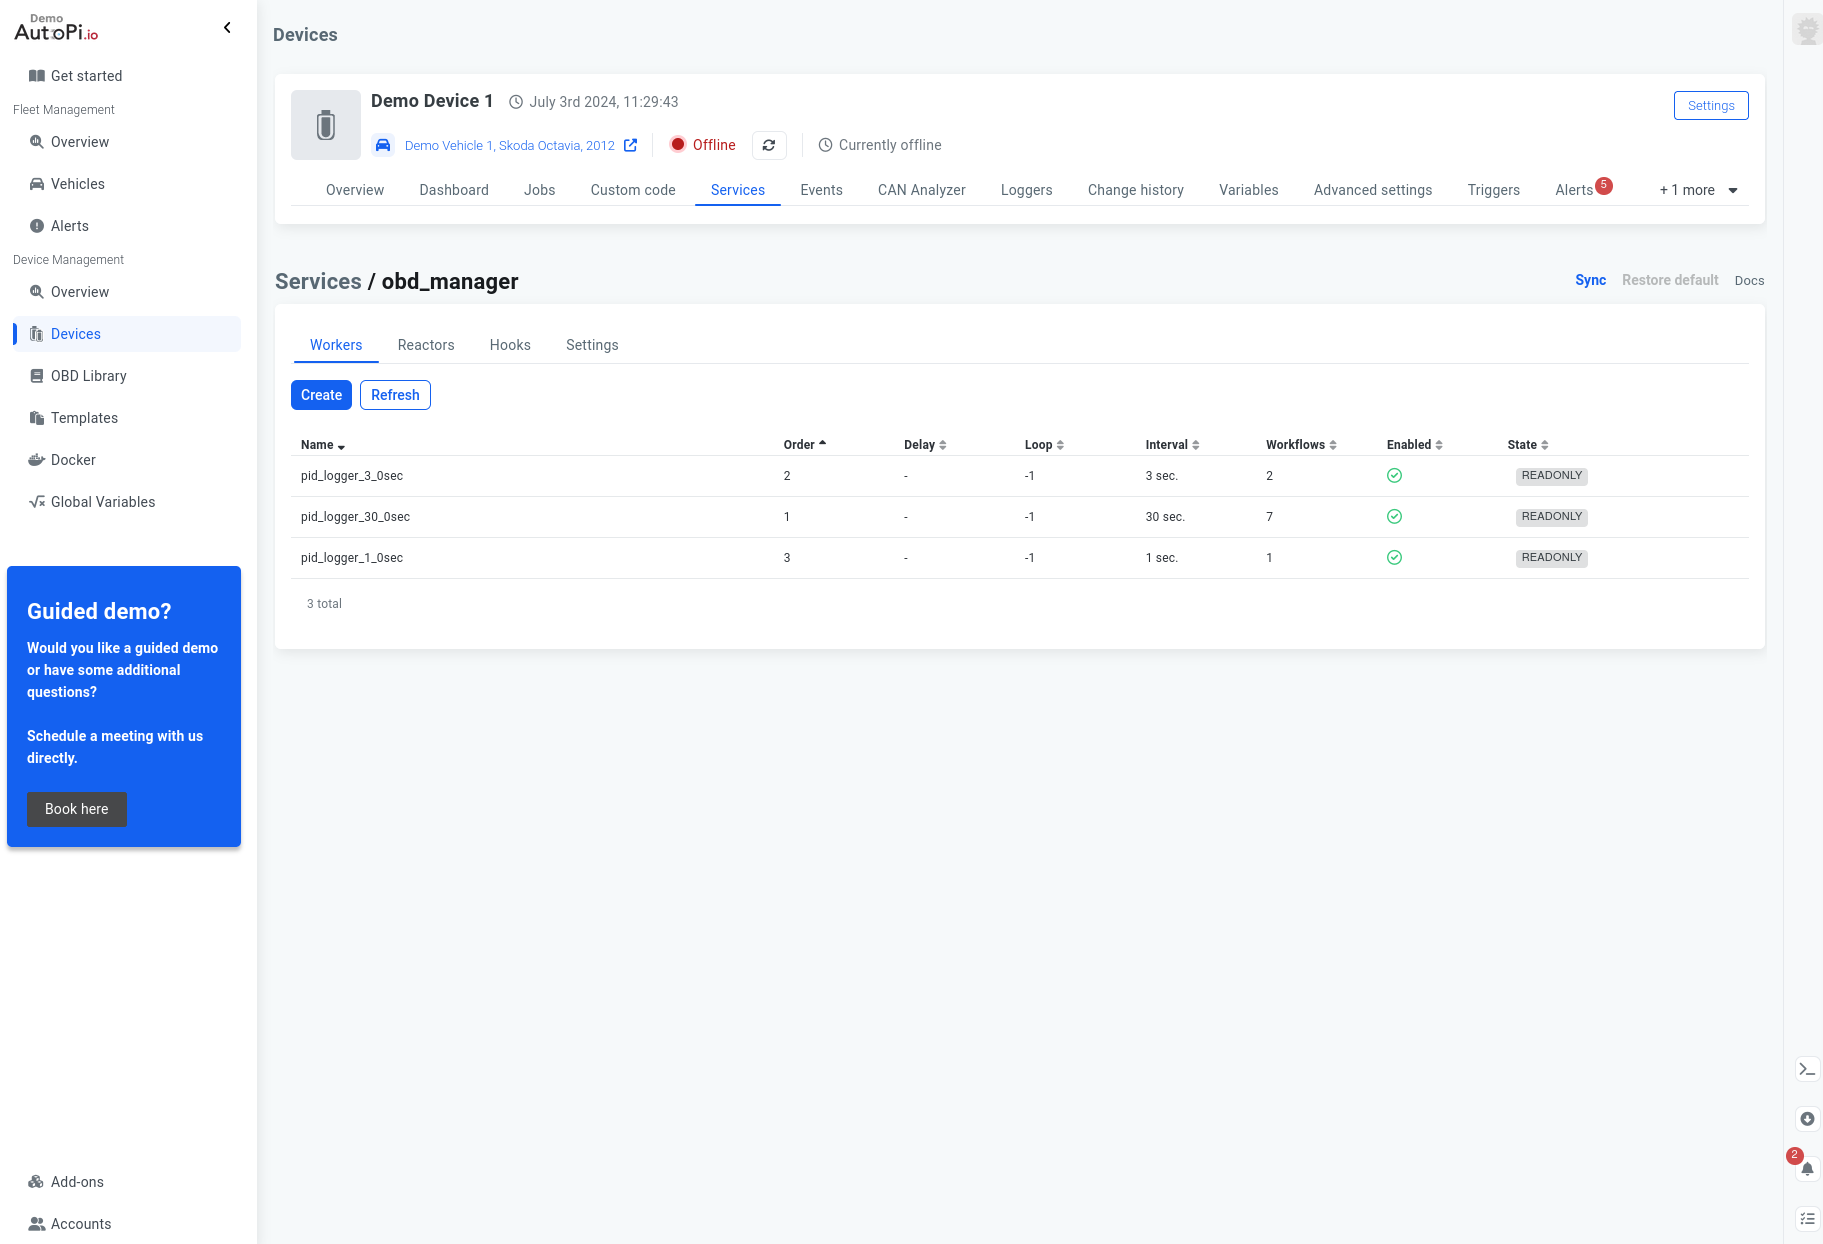
For this guide, a worker will be created inside the obd_manager. Navigate to Device > Services and select the obd_manager entry. From the manager's home page, click + Create to open the worker creation window:
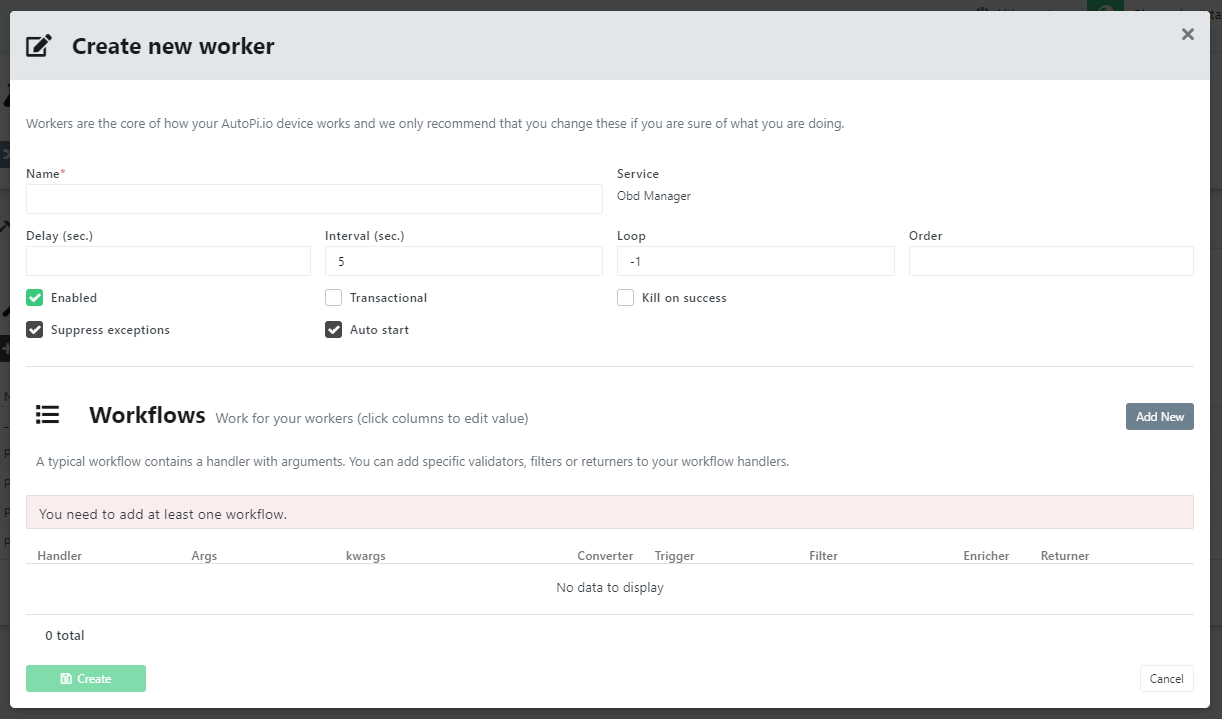
The creation window contains the following fields:
-
Name — A descriptive name for the worker, used for identification purposes.
-
Delay — The number of seconds to wait before the worker begins its first execution loop.
-
Interval — The time (in seconds) between each execution loop.
-
Loop — The number of times the worker will execute within a single power cycle of the AutoPi device:
- Less than 0: The worker loops indefinitely.
- 0 or more: The worker executes the specified number of times and then stops. Total executions equal the loop count plus one.
-
Order — Determines the execution order relative to other workers in the same service. Workers with a lower order value execute first.
-
Transactional — When enabled and a workflow fails, all subsequent workflows on the same worker are skipped. When disabled, remaining workflows continue to execute regardless of prior failures.
Workflows
Each workflow is represented as a row in the table and consists of the following columns:
-
Handler — The first step in the workflow. Communicates directly with the device hardware and produces the initial output.
-
args — Positional arguments passed to the handler.
-
kwargs — Keyword arguments passed to the handler.
-
Converter — Transforms the handler output into a more usable form.
-
Trigger — Executes logic based on the handler result, such as playing a beep sound.
-
Filter — Determines whether the data is significant enough to continue processing. If a falsy value is returned (e.g.
False,None, or an empty string), execution stops. -
Enricher — Augments the data by adding computed or supplementary values.
-
Returner — Delivers the result to a destination, such as saving it to a file or forwarding it to a cloud platform. The built-in Cloud returner, for example, sends data to my.autopi.io.
All of the above — except args and kwargs — are referred to as hooks and are covered in the next section.
Available handlers vary by service. For a full reference, see the services page. For this guide, the query handler will be used to continuously query OBD data.
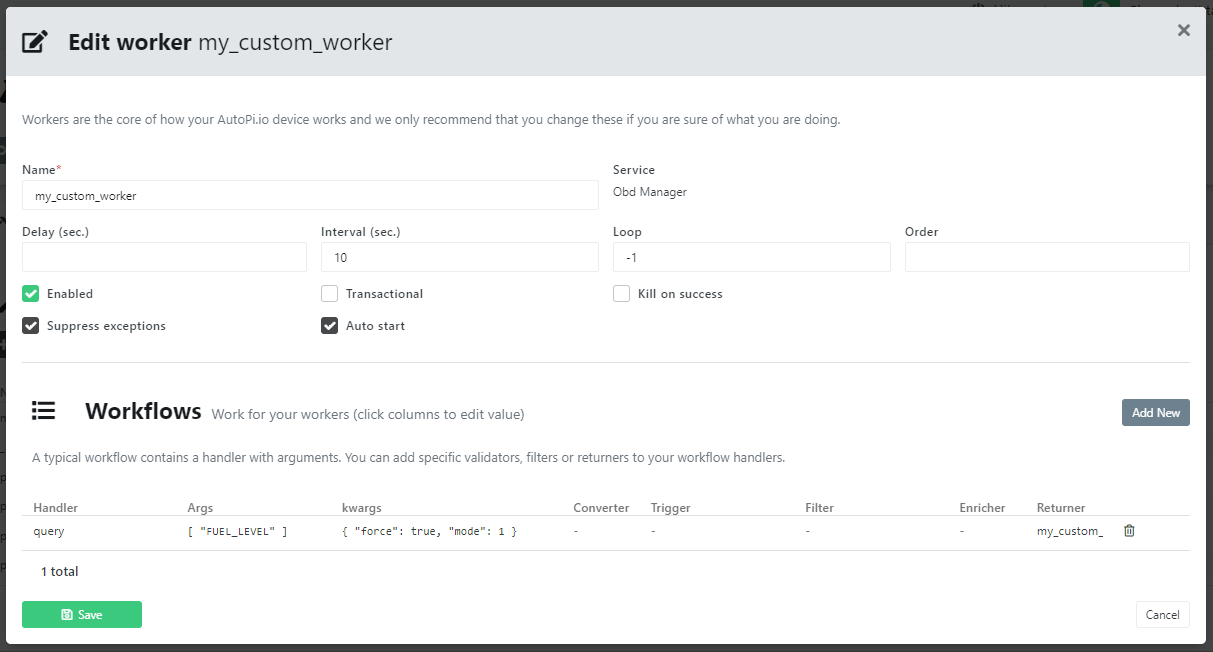
Arguments (args) and keyword arguments (kwargs) are specified in JSON format — note that JSON requires double quotes rather than single quotes. To read the fuel level, specify the following args:
[ "FUEL_LEVEL" ]
The kwargs are optional but provide additional control over execution:
{
    "mode": 1,
    "force": true
}
With the handler configured, the remaining workflow steps are optional and depend on your use case. To persist the data, add a returner — see the Create Custom Returners guide for details. The completed worker configuration looks like this:
Click Save and allow the device to sync the changes. After a service restart, the device will begin executing the new worker.
Hooks
Custom hooks can be created by adding a new custom code module under Device > Custom Code with an execution type. Each hook must then be registered to the relevant service via the Hooks tab.
All hooks must follow this function signature:
def some_function_name(result):
    # work with result and return some manipulated value
    return value
The function receives a result and returns a value. If a falsy value is returned at any point in the workflow, execution of subsequent steps will stop. The exception to this rule is triggers — they always execute, even if an earlier step fails or raises an exception. This ensures that time-sensitive logic in triggers is never skipped.
Troubleshooting
The service does not start, or no logs are appearing
- Verify that the service is enabled in the Cloud and that it is listed in the engines file at
/etc/salt/minion.d/engines.conf. - Confirm that the associated custom module contains valid Python code.
- Enable debug logging on the device via the advanced settings, restart the Salt minion, and review the logs for errors.
To filter logs for a specific service, run the following command on the device:
sudo tail -f /var/log/salt/minion | grep service_name
Conclusion
Workers are a powerful mechanism for interacting with the hardware components of an AutoPi device or your vehicle. They can run continuously or for a fixed number of iterations, and their workflows can be composed to achieve complex outcomes without writing custom code. Make use of them whenever you need reliable, repeatable communication with device hardware.
 Buy AutoPi device
 Compare all AutoPi devices
 Contact our sales team