Geofences


Overview
Geofences are virtual boundaries on a map that define areas of interest for your fleet. They enable you to monitor vehicle movements in real time and automatically respond to location-based events. With geofences, you can:
- Monitor deliveries by tracking when vehicles enter or exit delivery zones
- Enforce restricted areas by preventing vehicles from entering out-of-country regions or unauthorized locations, and receive immediate alerts
- Improve safety by receiving instant notifications when a vehicle crosses a boundary
- Automate workflows by triggering actions (email notifications, webhook requests, or cloud alerts) based on geofence events
Geofences integrate seamlessly with other AutoPi Cloud features. Use Templates to apply geofences across your entire fleet at scale, Triggers to automate cloud-side responses when vehicles enter or exit designated areas, and Event Reactors to execute real-time actions directly on the device — such as playing an audible alert to immediately notify the driver.
Accessing Geofences
Navigate to the Vehicles section in the Fleet Management tab. Select a vehicle, then click the Geofences tab to view the world map and any created geofences.
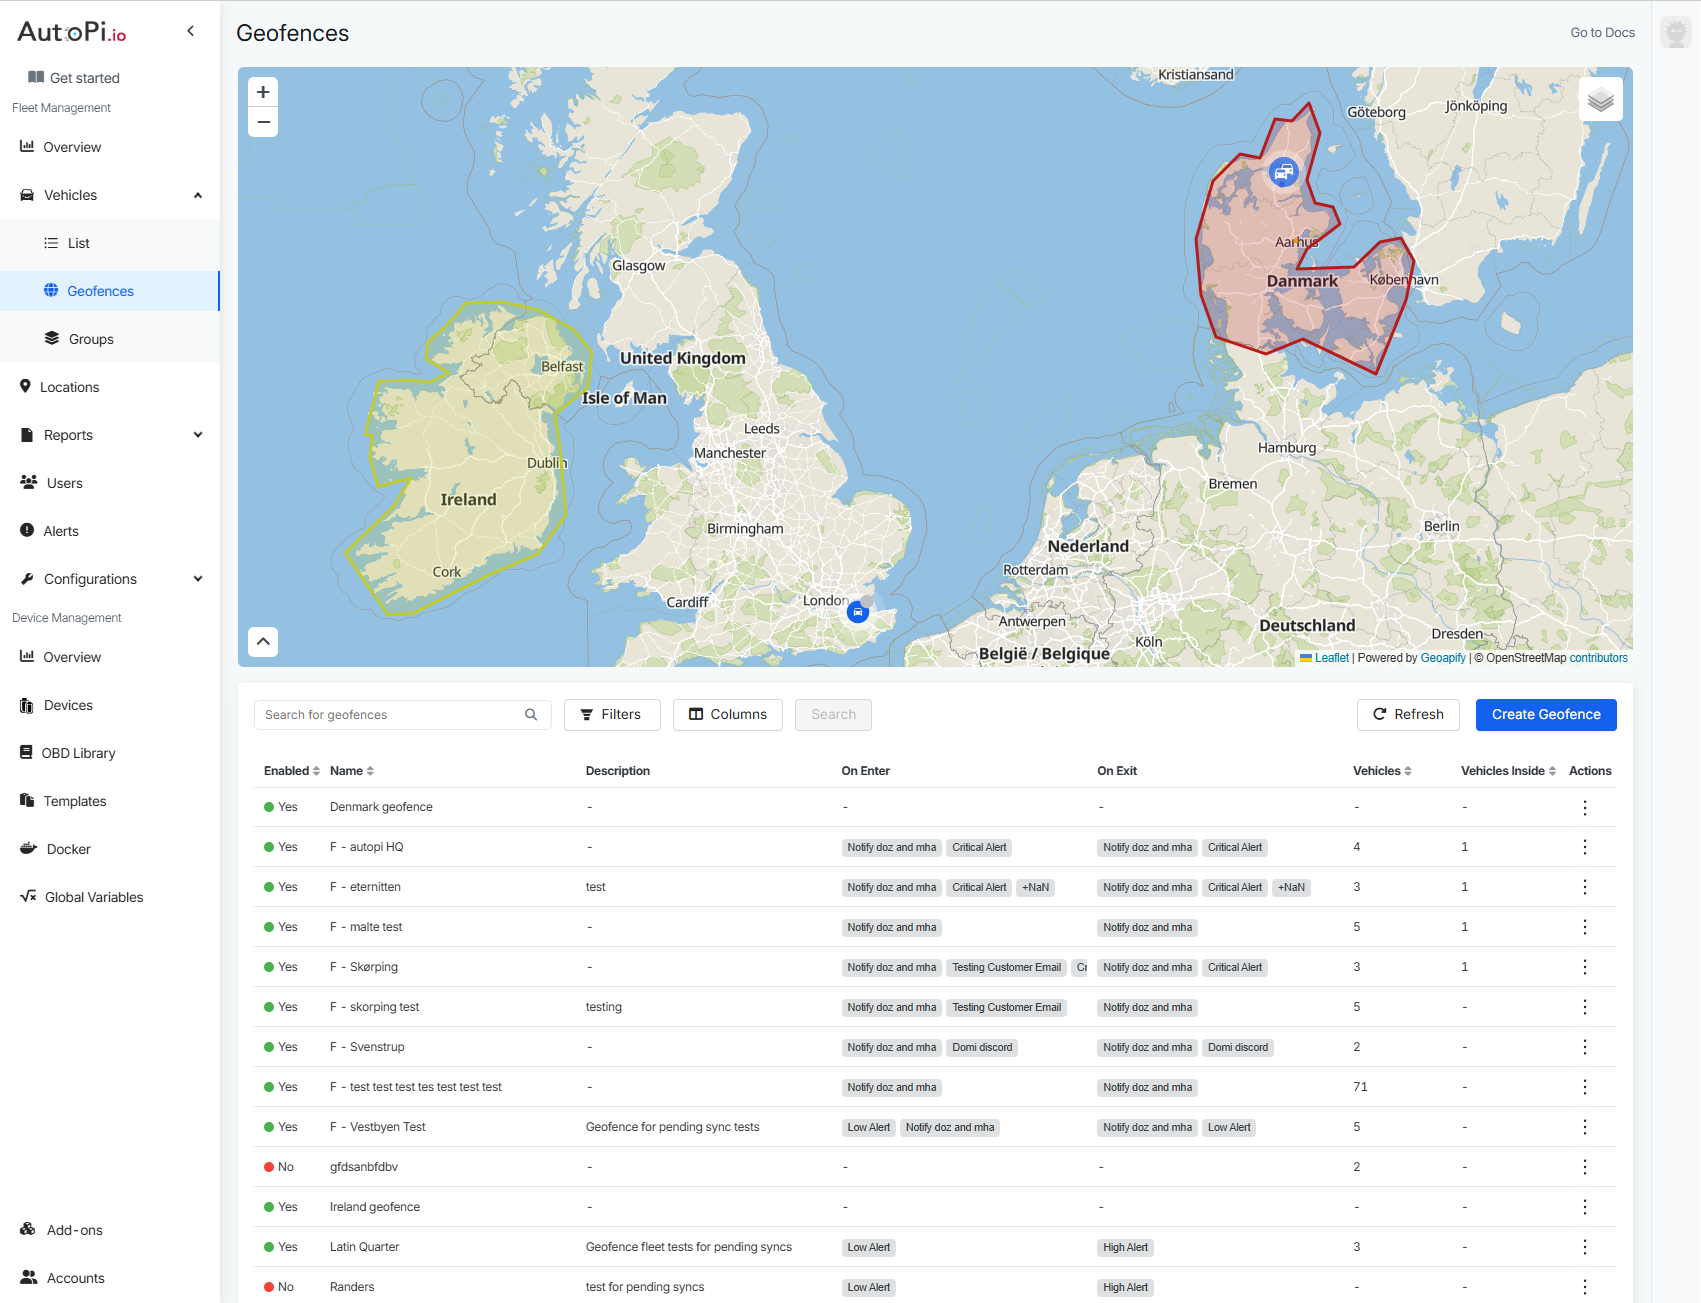
Creating a Geofence
Follow these steps to create a new geofence:
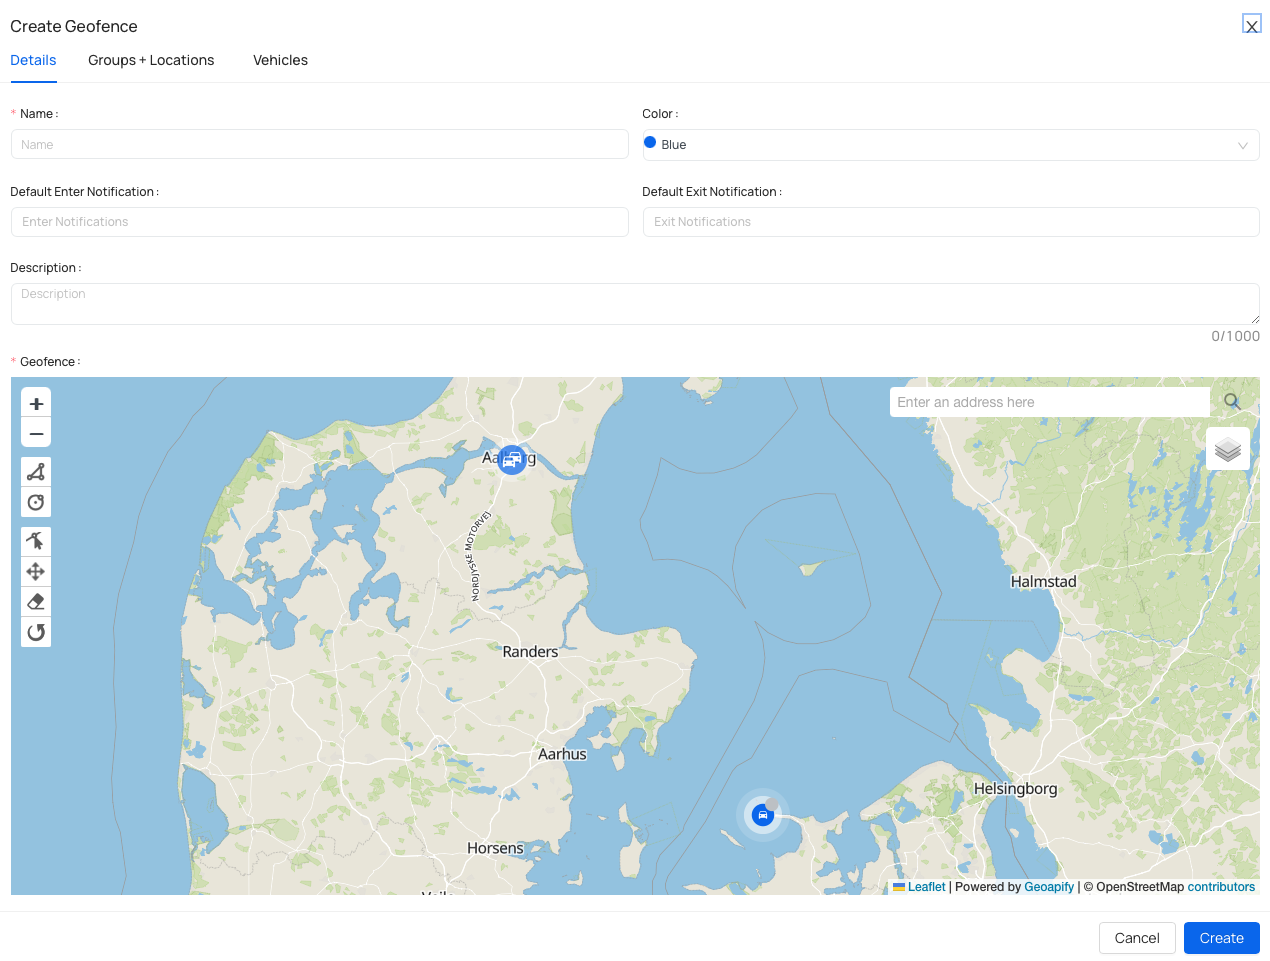
Step 1: Enter Geofence Details
Click Create to open the configuration panel with three tabs: Details, Groups, and Vehicles. Start with the Details tab:
- Name: assign a descriptive name for internal identification and reporting.
- Description (optional): add context about the geofence's purpose (e.g., "Downtown delivery zone" or "Restricted border area").
- Color: choose a color to represent the geofence on the map for easy visual identification.
Step 2: Configure Notifications
In the Default Notification section:
- Select one or more notification channels to receive alerts when vehicles enter or exit the geofence.
- Note: notification channels are configured once in Notification Channels and then reused here.
- Notifications will be sent through your chosen channels when geofence events occur.
Step 3: Draw the Geofence Boundary
On the map:
- Zoom to the area where you want to define the boundary.
- Use the drawing tools on the left sidebar to create either a circle or polygon boundary.
- Additional tools allow you to edit, drag, remove, or rotate layers as needed.
Step 4: Add Vehicle Groups (Optional)
In the Groups+Locations tab:
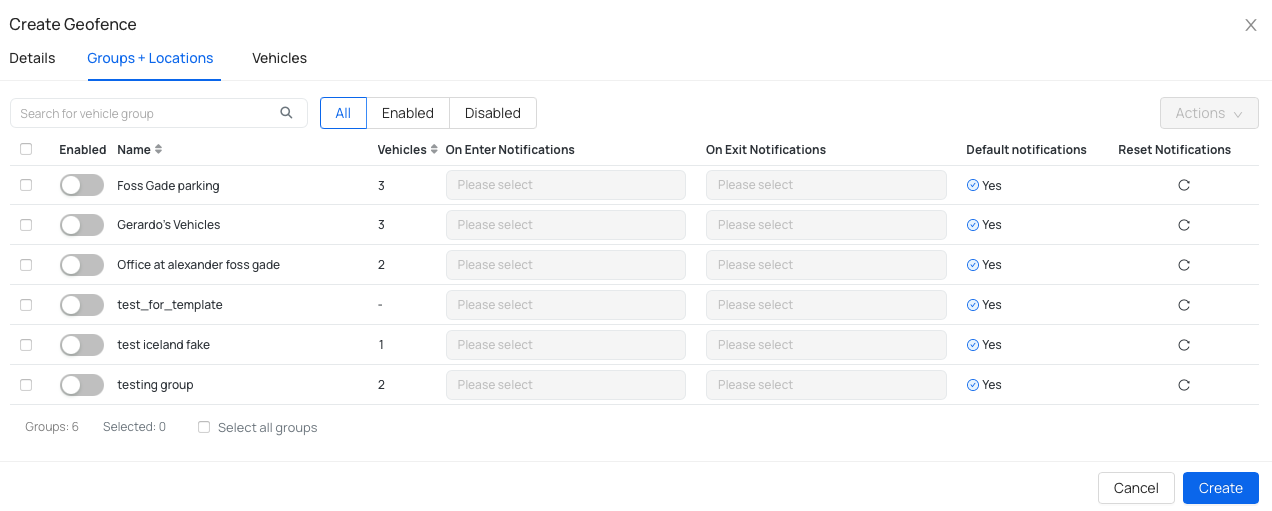
- If you've created vehicle groups, add them to the geofence to automatically apply the geofence to all vehicles in those groups (see Vehicle Groups).
- If you've created location, add it to the geofence to automatically apply the geofence to all vehicles in that location (see Locations).
- Use the search filter to find specific groups or locations.
- Select groups/locations by checking the boxes next to them.
- Once groups/locations are selected, use the Actions menu (top right) to bulk edit notifications, enable/disable groups, or reset notification channels.
- Check-marked groups/locations will have the geofence applied to all their vehicles.
Step 5: Add Individual Vehicles
In the Vehicles tab:
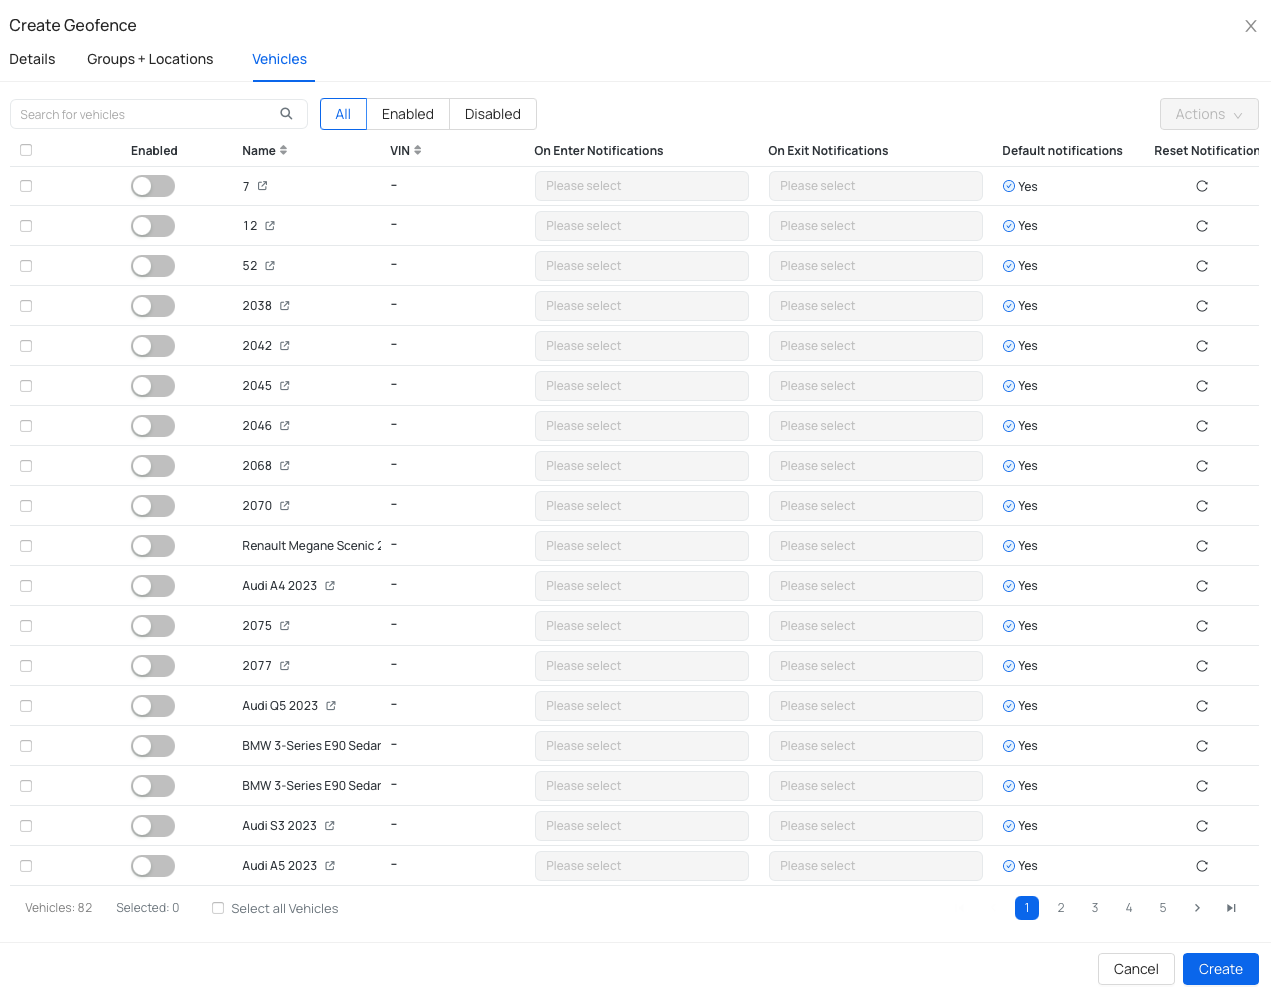
- If you prefer to add vehicles individually or haven't created vehicle groups/locations, enable specific vehicles here.
- Search by vehicle name or VIN.
- Click the preview icon next to a vehicle name to confirm you're selecting the correct vehicle.
- Enable vehicles by checking their boxes.
Step 6: Save the Geofence
Click Create to save. You can modify geofence details, add more vehicles, or adjust groups at any time after creation. A confirmation message will appear when the geofence is successfully created.
How Fleet Geofences Work
Once a geofence is created and vehicles are assigned, the AutoPi Cloud continuously monitors vehicle positions and triggers events when geofence states change.
Understanding Geofence Events
When a vehicle enters or exits a geofence, the AutoPi device logs its position. The system checks if the geofence state has changed. If 3 consecutive positions confirm the state change, an event is triggered:
vehicle/geofence/GEOFENCE_NAME/enter— vehicle entered the geofence.vehicle/geofence/GEOFENCE_NAME/exit— vehicle exited the geofence.
These events are sent to the AutoPi Cloud, where they can be used for monitoring, notifications, and automation.
Monitoring Geofence Events
You can view and filter all geofence events in the Device → Events tab:
- Navigate to your device and go to the Events tab.
- Use the filter option to search for specific geofence events.
- Filter by geofence name (e.g.,
vehicle/geofence/Downtown Zone/enter) to see events for a specific geofence. - Filter by event type (enter/exit) to focus on the events you need.
This allows you to verify that geofence events are being captured correctly and can be used for triggers, reactors, and automation.
Reacting On-Device with Event Reactors
In addition to cloud-side automation, geofence events can be handled directly on the AutoPi device using Event Reactors. An Event Reactor listens for a specific event emitted by the device and executes a defined action immediately — without requiring a round-trip to the cloud. This makes it ideal for time-sensitive responses such as alerting a driver the moment a geofence boundary is crossed.
A practical example is playing an audible beep on the device when a vehicle enters a restricted area. As the alert sounds inside the vehicle, the driver is immediately made aware of the boundary violation and can take corrective action.
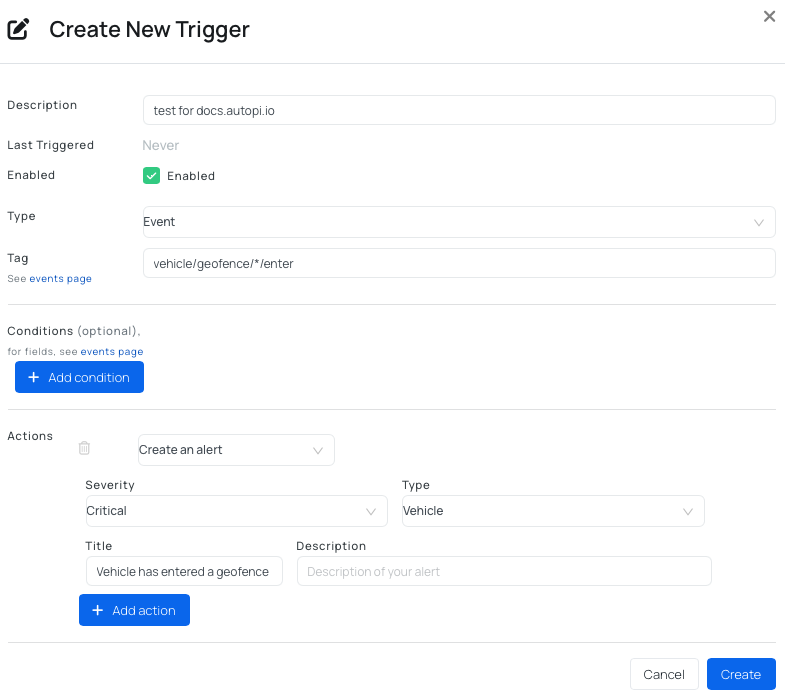
Setting up a Reactor for Geofence Events:
- Navigate to Services → Event Reactor in the device configuration.
- Click Create to define a new reactor.
- Set the event to match the geofence event pattern, for example:
vehicle/geofence/*/enter— reacts to any geofence entry event.vehicle/geofence/Restricted Zone/enter— reacts to entry into a specific named geofence.
- Define the action to execute on the device when the event occurs — for example, triggering a beep alert.
- Save the reactor.
Once active, the reactor will respond to geofence events in real time, directly on the AutoPi device, providing an immediate, driver-facing feedback mechanism to complement your cloud-side monitoring and alerts.
Integrating Geofences with Templates
Use Templates to automatically apply geofences to multiple vehicles at once, ensuring consistent geofence coverage across your fleet without manual configuration for each device.
How It Works
When a fleet geofence is configured and a template is assigned to a device:
- The geofence rules are applied to that device as part of the template configuration.
- Any new device subsequently assigned to the template will have the geofence applied automatically.
- This eliminates the need to manually add geofences to each new vehicle.
This approach is ideal for scaling across large fleets, where you need consistent geofence coverage without repeating configuration for each individual vehicle.
How to Add Geofences to a Template
Follow these steps to add geofences to a template:
- Navigate to Templates in the Fleet Management tab
- Either click on an existing template from the table or create a new template
- Click on Settings
- In the geofences field, select or configure the geofences you want to apply to this template
- Save your changes
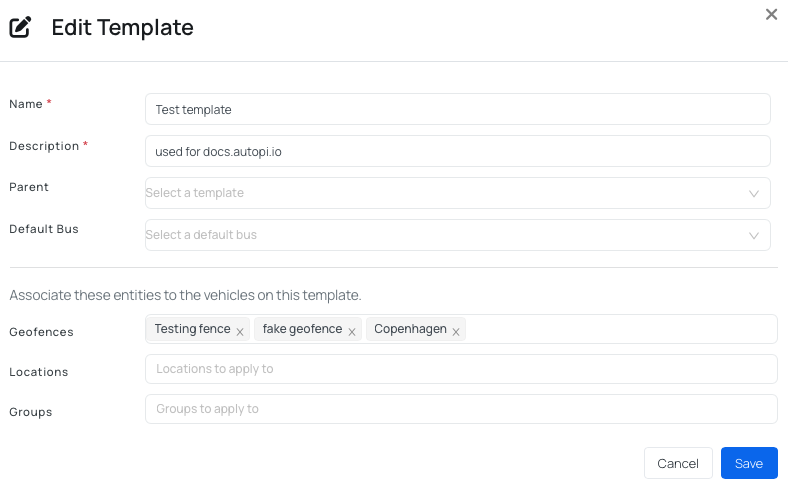
Once saved, all devices assigned to this template will automatically have the geofences applied.
Best Practice
Create templates for different geofence scenarios (e.g., "Delivery Zones," "Restricted Areas") and assign them to vehicle groups. New vehicles added to those groups will automatically inherit the geofence configurations.
Automating Actions with Geofence Events and Triggers
Use Triggers to automatically respond to geofence events. Triggers listen for specific geofence events (enter or exit) and perform defined actions such as sending notifications, firing webhooks, or creating alerts.
Common Use Cases
- Delivery Confirmation: send an email notification when a vehicle enters a delivery zone.
- Unauthorized Access Alert: send an immediate alert when a vehicle enters a restricted area.
- Webhook Integration: fire a webhook request when a vehicle exits a dispatch center to update your logistics system.
- Route Monitoring: send an alert on the AutoPi Cloud when a vehicle deviates from planned geofence boundaries.
Setting Up a Trigger for Geofence Events
- Navigate to Device → Events to confirm that geofence events are being received and captured correctly.
- Go to Triggers and click Create.
- Set the event condition to match one of the following patterns:
vehicle/geofence/*/enter— triggers on entry into any geofence.vehicle/geofence/*/exit— triggers on exit from any geofence.- Or use a specific geofence name instead of
*(e.g.,vehicle/geofence/Downtown Zone/enter) to target a particular geofence.
- Define the action to perform when the event occurs:
- Send email notification.
- Send alert on AutoPi Cloud.
- Fire a webhook request to an external system.
- Save the trigger.
Example: Restricted Area Violation Alert
To receive immediate alerts when a vehicle enters a restricted area:
- Create a geofence for the restricted area (e.g., "Out of Country Zone").
- Create a trigger with event condition:
vehicle/geofence/Out of Country Zone/enter. - Set the action to send an alert on the AutoPi Cloud or email notification.
- When a vehicle enters the restricted geofence, you'll be notified instantly, allowing you to react quickly.
Use Case: Restricted Areas
Geofences are particularly useful for enforcing areas where vehicles should never travel. Create geofences around regions you want to prevent vehicles from entering, then set up triggers to notify you immediately when a vehicle violates these boundaries.
Examples
- Out-of-Country Boundaries: define geofences around neighboring countries to prevent drivers from crossing international borders.
- Off-Limits Zones: restrict vehicles from entering competitor facilities, dangerous areas, or construction zones.
- Authorized Service Areas: ensure service vehicles only operate within assigned regions.
By combining geofences with triggers, you gain real-time visibility and can take immediate action to redirect vehicles or investigate unauthorized movement.
 Buy AutoPi device
 Compare all AutoPi devices
 Contact our sales team