Setting up DoIP

The DoIP solution described here only works with the AutoPi TMU CM4.
When installed, the Ethernet port on the AutoPi device will internally be used for DoIP. Do not connect anything to the Ethernet port.
Never install the upgraded device in a vehicle that does not support DoIP. Using an Ethernet based protocol in a vehicle that only supports CAN can affect the performance of the vehicle.
Introduction
DoIP is a modern protocol used in the automotive industry for diagnostics and communication between vehicle components and external diagnostic equipment. This technology plays a crucial role in diagnosing and maintaining vehicles, ensuring they operate efficiently and safely. As vehicles become more connected and complex, the need for advanced diagnostic capabilities increases. DoIP provides a robust framework that allows for faster, more reliable data transmission compared to older protocols.
Contents
This guide covers configuring Diagnostics over IP on the AutoPi TMU CM4 or CAN-FD Pro devices. Paired with the AutoPi DoIP HAT, these devices can be upgraded to support DoIP. See this guide on how to install the DoIP HAT. It's also possible to order the device pre-installed with the DoIP Solution.
Ethernet pin assignment of the OBD-II connector
After installing the DoIP HAT your AutoPi device is capeable of communication over an Ethernet based protocol instead of a CAN based protocol. This is a protocol used in some newer vehicles. The standard pinout then changes in the 16 pin OBD-II connector.
After the upgrade, four pins are used for Ethernet communication and one pin is used for DoIP activation. Two different DoIP pinout configurations are supported by the AutoPi HAT. Only the Ethernet Rx lines change places between the two configurations.
DoIP main pinout
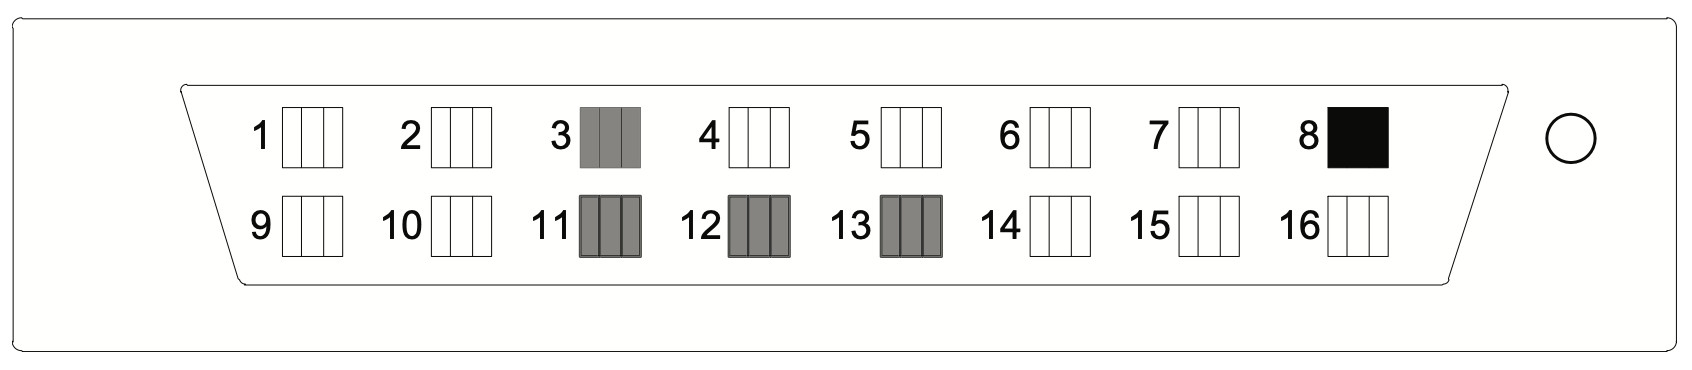
| OBD pinout | DoIP usage |
|---|---|
| Pin 3 | Ethernet Rx (+) |
| Pin 11 | Ethernet Rx (-) |
| Pin 12 | Ethernet Tx (+) |
| Pin 13 | Ethernet Tx (-) |
| Pin 8 | DoIP Activation |
DoIP alternative pinout
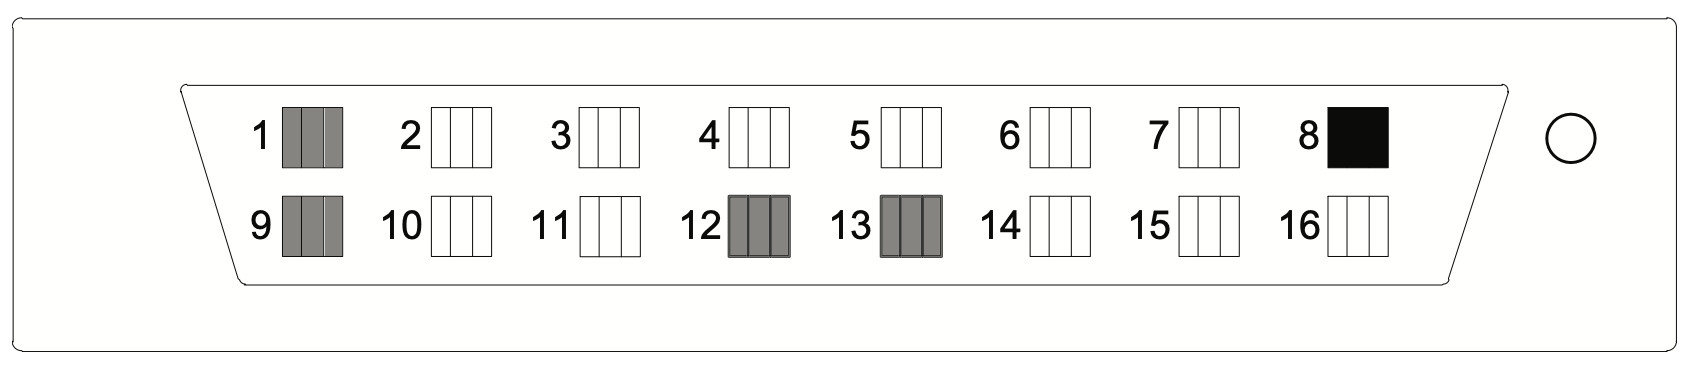
| OBD pinout | DoIP usage |
|---|---|
| Pin 1 | Ethernet Rx (+) |
| Pin 9 | Ethernet Rx (-) |
| Pin 12 | Ethernet Tx (+) |
| Pin 13 | Ethernet Tx (-) |
| Pin 8 | DoIP Activation |
Controlling the DoIP port
Through the AutoPi Core software, it is possible to control the pinout configuration to be used.
Using the DoIP software
The AutoPi DoIP integration is based on the udsoncan library. The integration implements all the services and helper classes from the library and thereby also support UDS (Unified Diagnostic Services).
Enable DoIP on your AutoPi device
Before you are able to fully use the DoIP software you need to set up some settings on your AutoPi device.
Steps to get into advanced settings for DoIP:
- Go to the Devices section in the menu.
- Select the device you want to work with.
- Click on Advanced settings.
- Click on Doip.
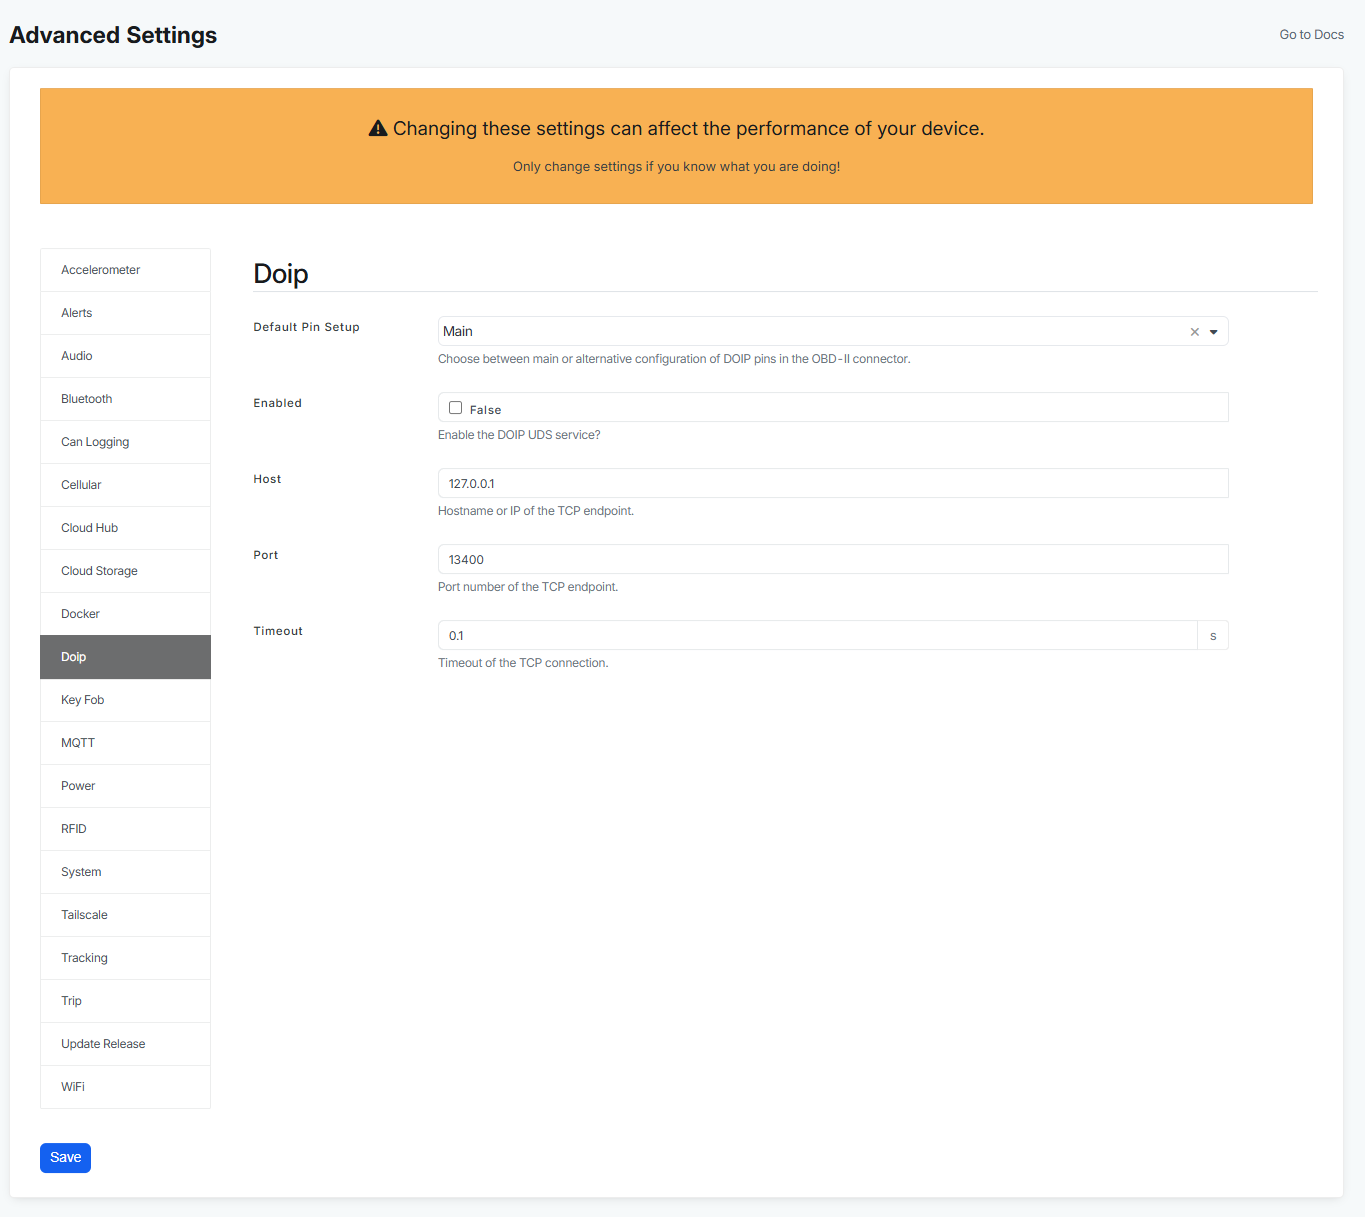
If you want to enable DoIP on your Autopi device you will need to configure these fields:
- Default Pin Setup - this setting changes the setup of the pins. You can read more about DoIP main pinout and DoIP alternative pinout in this guide above. By default this setting is set to main pinout as that one is used more frequently.
- Enabled - this setting allow you to enable the DOIP UDS service. By default it is disabled but if you want to start using DoIP, enable it here.
- Host - specify the hostname or IP of the TCP endpoint of the vehicle to connect to.
- Port - specify the port number of the TCP endpoint. The default value is set to
13400. You can however change this if the port number is different for your endpoint. - Timeout - timeout of the TCP connection. The default value is set to
0.1and should be changed only if you experience problems with connection timeouts.
DoIP activation
This activation needs to be set up every time the device boots up.
After you have finished setting up the Advanced Settings for your device, you will need to run a command to set the DoIP activation pin high. This will signal to the car that the DoIP connection should be made active.
The DoIP HAT works in conjunction with specific software components on the AutoPi device:
doip_manager: A background service managed through the AutoPi Cloud that handles DoIP communication.doip: A command module that allow users to manage the DoIP connection and perform diagnostics using UDS.
Steps to activate the DoIP interface:
- Activate the DoIP interface by running the command:
doip.interface activate - Connect the DoIP endpoint of the vehicle by running the command:
doip.interface connect - Get more information about available UDS commands by running:
doip.uds help - Once you have found the UDS command you want to use, you can run the additional help command to receive more information, for example:
doip.uds help change_session - Finally you can run an UDS command like this:
doip.uds change_session 1
You can read about more commands in our DoIP commands guide.
 Buy AutoPi device
 Compare all AutoPi devices
 Contact our sales team