Data Troubleshooting


You are experiencing issues with getting the data out of your CAN-FD Pro device? This guide help you step-by-step to identify and resolve common problems related to wrong configurations on device, configurations to CAN Loggers, verification of CAN channels, nominal voltage detection, and internet connectivity issues.
Get in touch here or send an email to support@autopi.io
Prerequisites:
Before following this guide, you must have completed the initial Setup guide.
Why am I not seeing any data?
If you've followed the Getting Started Guide and tested your AutoPi CAN-FD Pro device during vehicle operation, but are not recording any data, this guide will help you identify and resolve common issues.
This guide is organized as a checklist, detailing potential reasons why your vehicle data might not be recorded. It is only intended for the AutoPi CAN-FD Pro device.
Common causes and solutions for no data recorded
1. Identify the current state of the device
Check the two LEDs on the side of the device. Both the green and blue LEDs should be lit. If the green LED is off and the blue LED is “breathing” or fully dimmed the device is either sleeping or hibernating. To resolve this re-plug or push the button on the side of the device to boot it up again.
For more details on LED status meanings, refer to this guide: LED and button states
2. Check the CAN loggers
Run the logger.status command on the device to see the status of data logger(s).
- If the device is connected to the Internet it can be done through the cloud terminal on AutoPi cloud.
- Or alternatively if you have direct SSH access How to SSH to your device to the device via LAN or VPN (for Tailscale, you can read more at this guide: How to connect to Tailscale) you can use the
autopiterminal command. - Or if you are nearby the device and can connect to it's local WiFi hotspot you can do it from the local admin UI on local.autopi.io. Here is a guide: Local development workflow.
Regardless of which of the above methods you use, you must run the command:
logger.status
Below is an example of the output of the command:
channels:
  can0:
    interface:
      autodetect:
        in_progress: false
        last_results:
          any_passive:
            bitrate: 500000
            frames_per_second: 710
            has_11bit_identifiers: true
            has_29bit_identifiers: false
            performed_at: '2025-05-07T09:50:43.347462'
            success: true
      bitrate: 500000
    loggers:
      raw:
        current_fps: 584.95
        decoders:
          dbc:
            failed_messages_count: 140000
            output_file_pattern: /opt/autopi/can0/loggers/raw/decoders/dbc/output/{input:}.jsonl
            output_handlers:
            - destination_path: s3://my-datalogger/a1eeabbd-cffa-f7c4-31a5-49b2c2340d3d/can0/decoded
              uploaded_files_count: 2
            total_messages_count: 140000
            type: STANDARD
        output_file_pattern: /opt/autopi/can0/loggers/raw/output/{ts:%Y%m%d%H%M}.log
        output_handlers:
        - destination_path: s3://my-datalogger/a1eeabbd-cffa-f7c4-31a5-49b2c2340d3d/can0/raw
          uploaded_files_count: 2
        received_error_frames_count: 613
        received_frames_count: 111101
  can1:
    interface:
      autodetect:
        in_progress: false
        last_results:
          any_passive:
            bitrate: 500000
            frames_per_second: 544
            has_11bit_identifiers: true
            has_29bit_identifiers: false
            performed_at: '2025-05-07T09:50:44.198244'
            success: true
      bitrate: 500000
    loggers:
      raw:
        current_fps: 586.66
        decoders:
          dbc:
            output_file_pattern: /opt/autopi/can1/loggers/raw/decoders/dbc/output/{input:}.mf4
            total_messages_count: 0
            type: ASAMMDF
        output_file_pattern: /opt/autopi/can1/loggers/raw/output/{ts:%Y%m%d%H%M}.log
        received_error_frames_count: 613
        received_frames_count: 113725
disks:
  /:
    free_space: 3 GB
    housekeeper:
      deleted_files_count: 0
      total_space_freed: 0 bytes
3. CAN bus detection
Verify the settings of the CAN channels. Configuration of the device is done through the AutoPi cloud.
4. Nominal voltage detection
When the device boots it attempts to autodetect the nominal voltage.
-
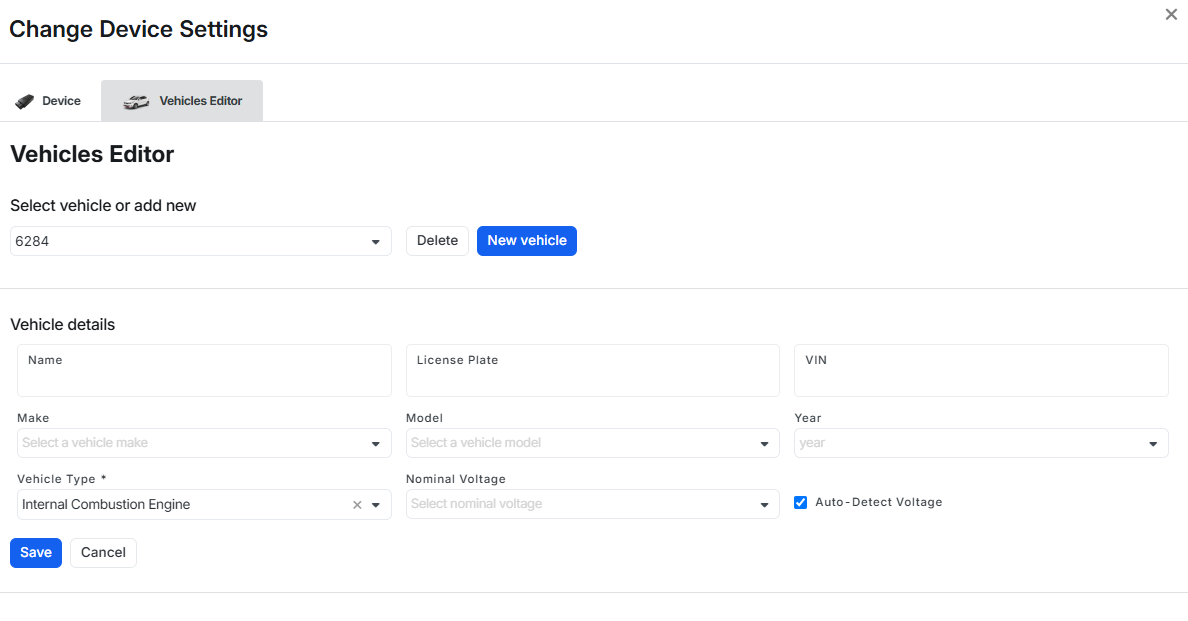
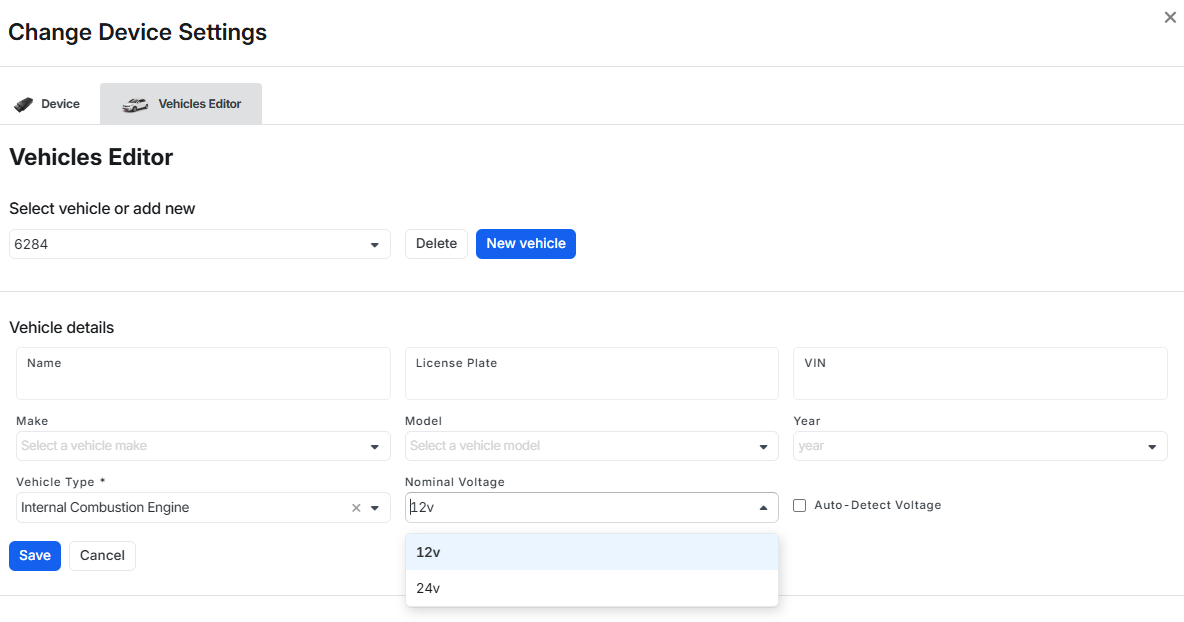
Auto-detect voltage: This is a new feature that comes enabled by default on all AutoPi CAN-FD Pro devices. That means you do not need to configure the nominal voltage manually - your device will automatically detect it. The result of autodetection of nominal voltage is available below the Events tab. If you want to double check if this feature is enabled, Go to Devices > Choose Device > Settings > Vehicle Editor to see if the Auto-Detect Voltage is enabled.
-
Manual configuration: If the device is unable to autodetect the nominal voltage on the vehicle, you might need to configure it manually. Go to Devices > Choose Device > Settings > Vehicle Editor > Nominal Voltage > click on the field and choose from 12V or 24V. Make sure the correct configuration is set from the dropdown.
5. Internet connectivity issues
Ensure your device is connected to the internet. If there are connectivity issues, follow the steps outlined in our 4G Internet Setup and Troubleshooting Guide.
6. Verify bitrates
Ensure the correct Bitrate is set for your vehicle, you can follow this guide: Find the correct Bitrate for your vehicle. The default list for Try Bitrates includes some of the most common used bitrates to make this process easier for you. This step allows you to make sure that you can receive any data by listening to these settings.
- You have 2 options here:
- 1. Try bitrates (auto mode): If you are unsure about your vehicle’s bitrate, this is the best choice. The device will automatically scan through a list of common CAN 2.0 and CAN FD bitrates.
- 2. Fixed bitrate (manual mode): If you know the exact bitrate for your vehicle you can input it directly to skip scanning.
Autodetect feature under CAN Channel settings, is used to figure out how to find the correct bitrate using 3 different detection strategies to ensure there is data incoming. You can read more in this guide, on How to find the correct bitrate. Every time the autodetection is performed, it triggers an event that can be seen in the events section on AutoPi cloud -> go to devices > pick the device > events. This should help you to understand a little better what is happening on a device. These are some of the examples for the events that can be used for verifying the bitrates:
vehicle/bus/can0/autodetectedvehicle/bus/can0/autodetect/any_passive/successfulvehicle/bus/can0/autodetect/any_passive/unsuccessful
7. Make sure you are receiving data
Step 1: Configure output handlers:
- To ensure your device sends data to the correct destination, you need to set up output handlers properly. This step is essential for reliable communication between your device and the receiving service.
- Follow the instructions in the guide here: How to set up Output Handlers.
Step 2: Verify file access via Wi-Fi hotspot:
- Once your output handlers are configured, verify that you can access the files from the device. This is important to confirm your setup is working correctly.
- Follow the instructions in the guide here: Accessing files via SFTP/SCP on AutoPi
 Buy AutoPi device
 Compare all AutoPi devices
 Contact our sales team