Getting started
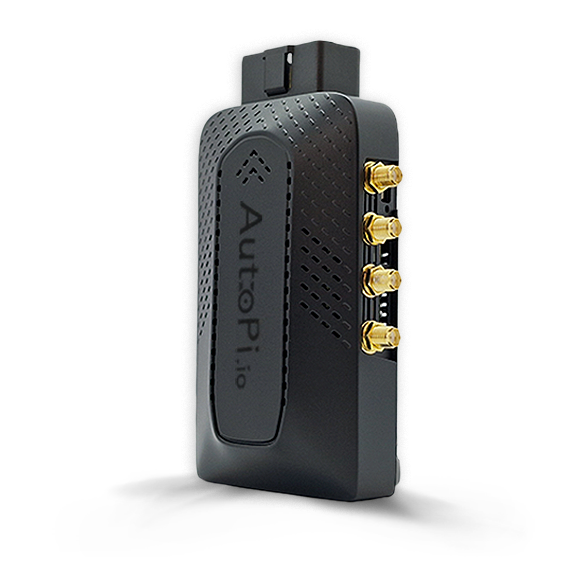
Welcome to AutoPi CAN-FD Pro Setup
This guide walks you through setting up an AutoPi CAN-FD Pro, from creating an account to configuring data output and remote file access.
Quick Start Summary
Complete the steps in order. If your device includes an AutoPi Cloud subscription and a pre-installed SIM card, you can skip the SIM installation and APN configuration steps.
- Step 1: Set up your account on AutoPi Cloud, you can read more in this section.
- Step 2: Register your device on AutoPi Cloud, you can read more in this section.
- Step 3: SIM card installation (if you did not purchased one from us), you can read more in this section.
- Step 4: Attach the External Antenna Kit to your AutoPi CAN-FD Pro device, you can read more in this section.
- Step 5: Locate an OBD port in your vehicle/equipment, you can read more about tips and tricks in this section.
- Step 6: Device installation to your vehicle's OBD-II port, you can read more in this section.
- Step 7: Connect your device to the AutoPi Cloud, you can read more in this section.
- Step 8: Connect to Local Administration on your device, and set up APN User and MTU, you can read more in this section.
- Step 9: Verify connectivity to ensure your APN setting is set properly, you can read more in this section. This setting is only for users using their own SIM card, if you have purchased a device with AutoPi SIM, you can skip this step.
- Step 10: Change your password, you can read more in this section.
- Step 11: Set up output handlers for data (where do you want the captured data to be send to), you can read more in this guide.
- Step 12: Access the files remotely, you can read more in this guide.
Important Safety and Setup Requirements
The AutoPi device connects directly to your vehicle's ECU. Follow these requirements before continuing:
- Power Off the Vehicle: Always ensure your vehicle is completely powered off before inserting the device for the first time.
- Vehicle Position: Work on and customize your device only when the vehicle is parked.
- Do Not Remove While Driving: Never disconnect the AutoPi while the vehicle is in operation.
- Power Source: The device can only be powered through the OBD-II port. Direct power to the Raspberry Pi is not supported and may cause damage.
- Advanced Settings: When modifying Advanced Settings, ensure you understand the implications, as changes may affect vehicle performance and battery life.
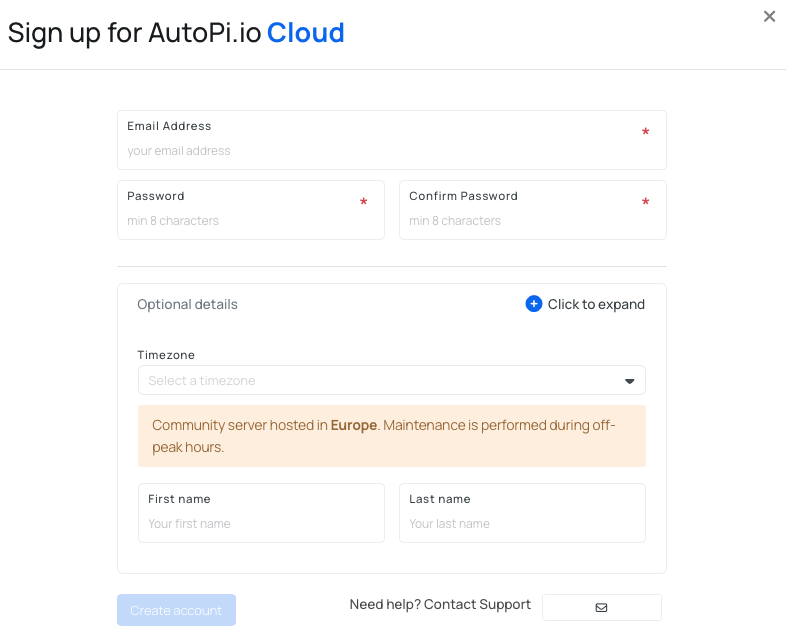
1. Set Up Your User Account
- Go to my.autopi.io.
- Select Sign up.
- Enter your email address and create a password.
- Optionally, expand the form and add your name and country. You can also add these details later.
- Select Create account.
2. Register Your Device
After creating an account, you can access the Cloud Platform features for fleet and device management. The next step is to register your device to unlock the platform’s full potential.
To add a device to your account, follow one of these methods:
Option 1: Via Device Management
- See the “Device Management” section of the Platform.
- Click on “Devices”.
- Find and click the “Register Device” button in the upper right corner.
Option 2: Via the Accounts Tab
- Navigate to the “Accounts” tab at the bottom of the left side menu on the Platform.
- Select “Devices”.
- Locate and click the “Register Device” button in the upper right corner.
After clicking the “Register Device” button, the registration tab will appear. Enter all necessary information:
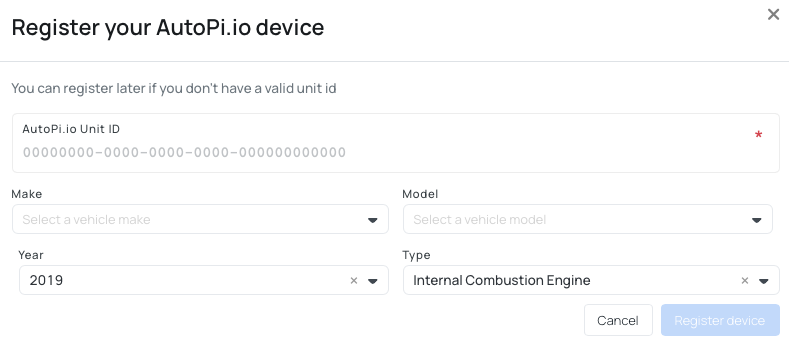
- Unit ID: this is the number on the side of your device. You can also find it in the. document attached in the email you received when the device was shipped.
- Vehicle Information: optionally include the make, model and year of the vehicle.
- Vehicle Type: choose the type of vehicle (ICE, Battery Electric Vehicle, Hybrid Electric Vehicle, or Plug-in Hybrid Electric Vehicle).
The device should now appear under Fleet Management > Vehicles and Device Management > Devices.
3. Ensure SIM Connectivity
If your AutoPi CAN-FD Pro includes a monthly cloud subscription, the SIM card is already installed. Continue to Step 4.
The hardware-only version requires a nano-SIM card that supports IPv4. Install the SIM card before connecting the AutoPi device to the vehicle:
- Locate the SIM card slot shown below.
- Hold the SIM card with the printed side facing up and the angled end pointing into the device.
- Gently insert the card until it clicks into place. Do not force it.
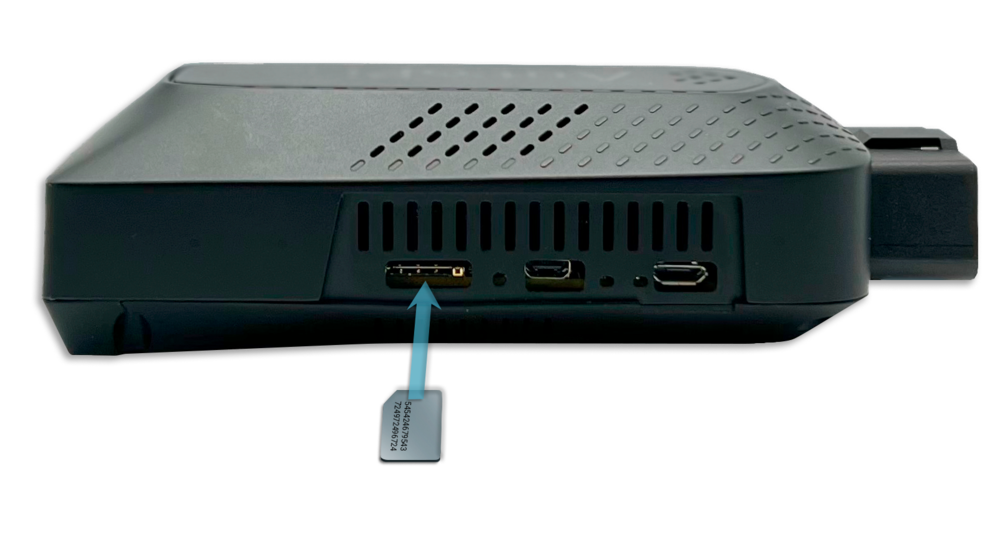
Inserting the SIM card in the wrong orientation or forcing it into or out of the slot may damage the device. Confirm the orientation before insertion.
Recommended US-based SIM providers include:
- AT&T
- T-Mobile
- An MVNO that uses either the AT&T or T-Mobile network
4. Attach the External Antenna Kit
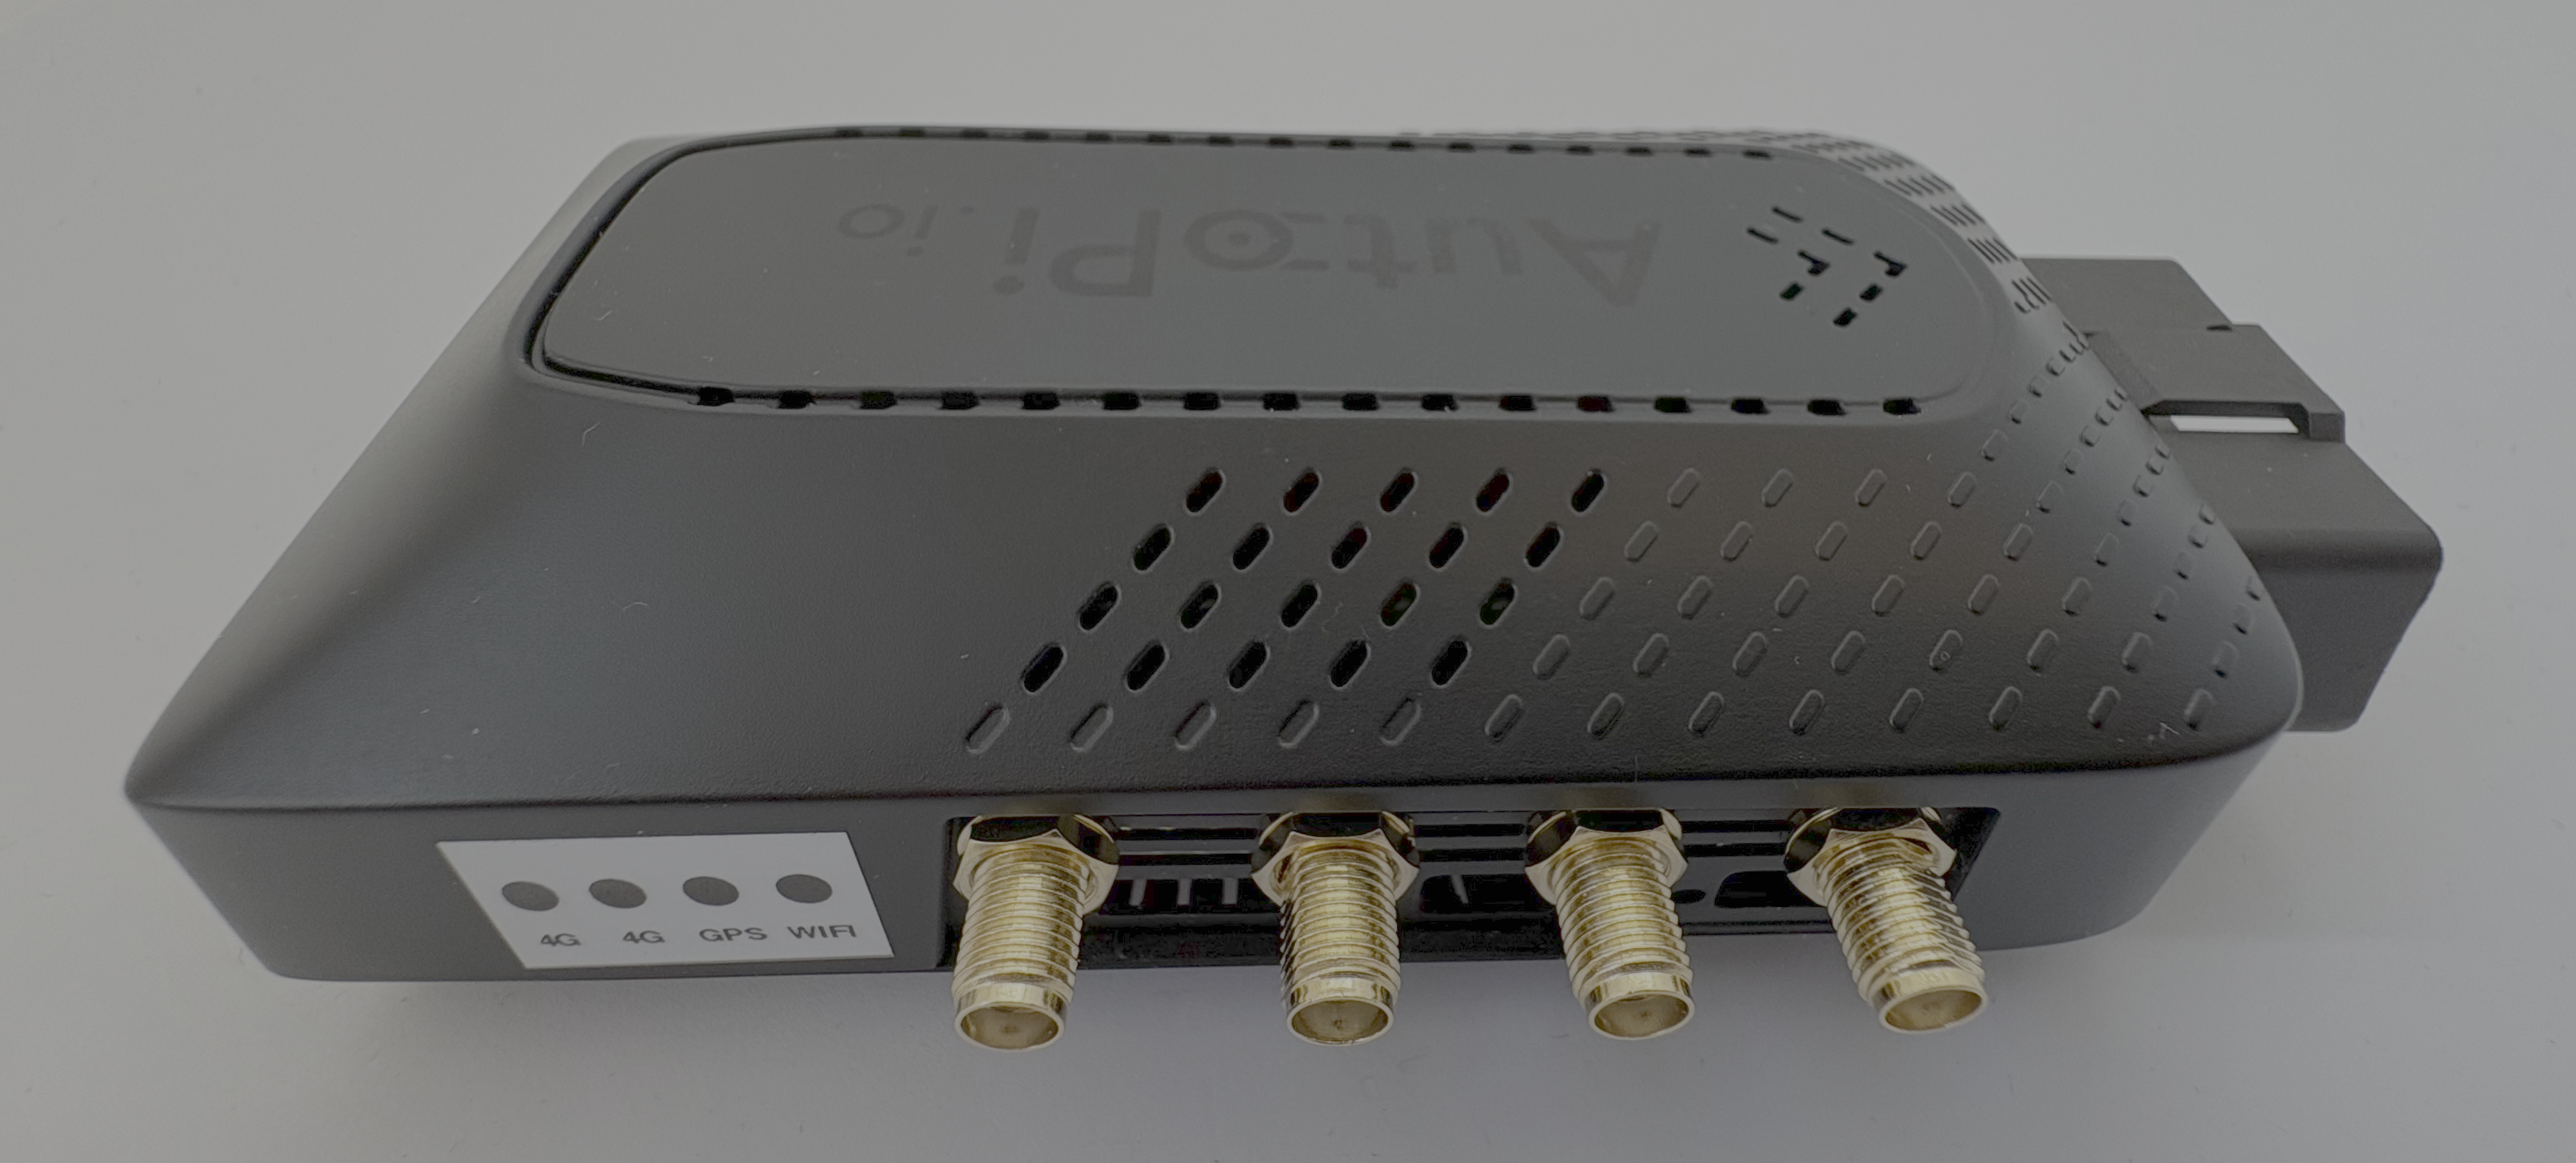
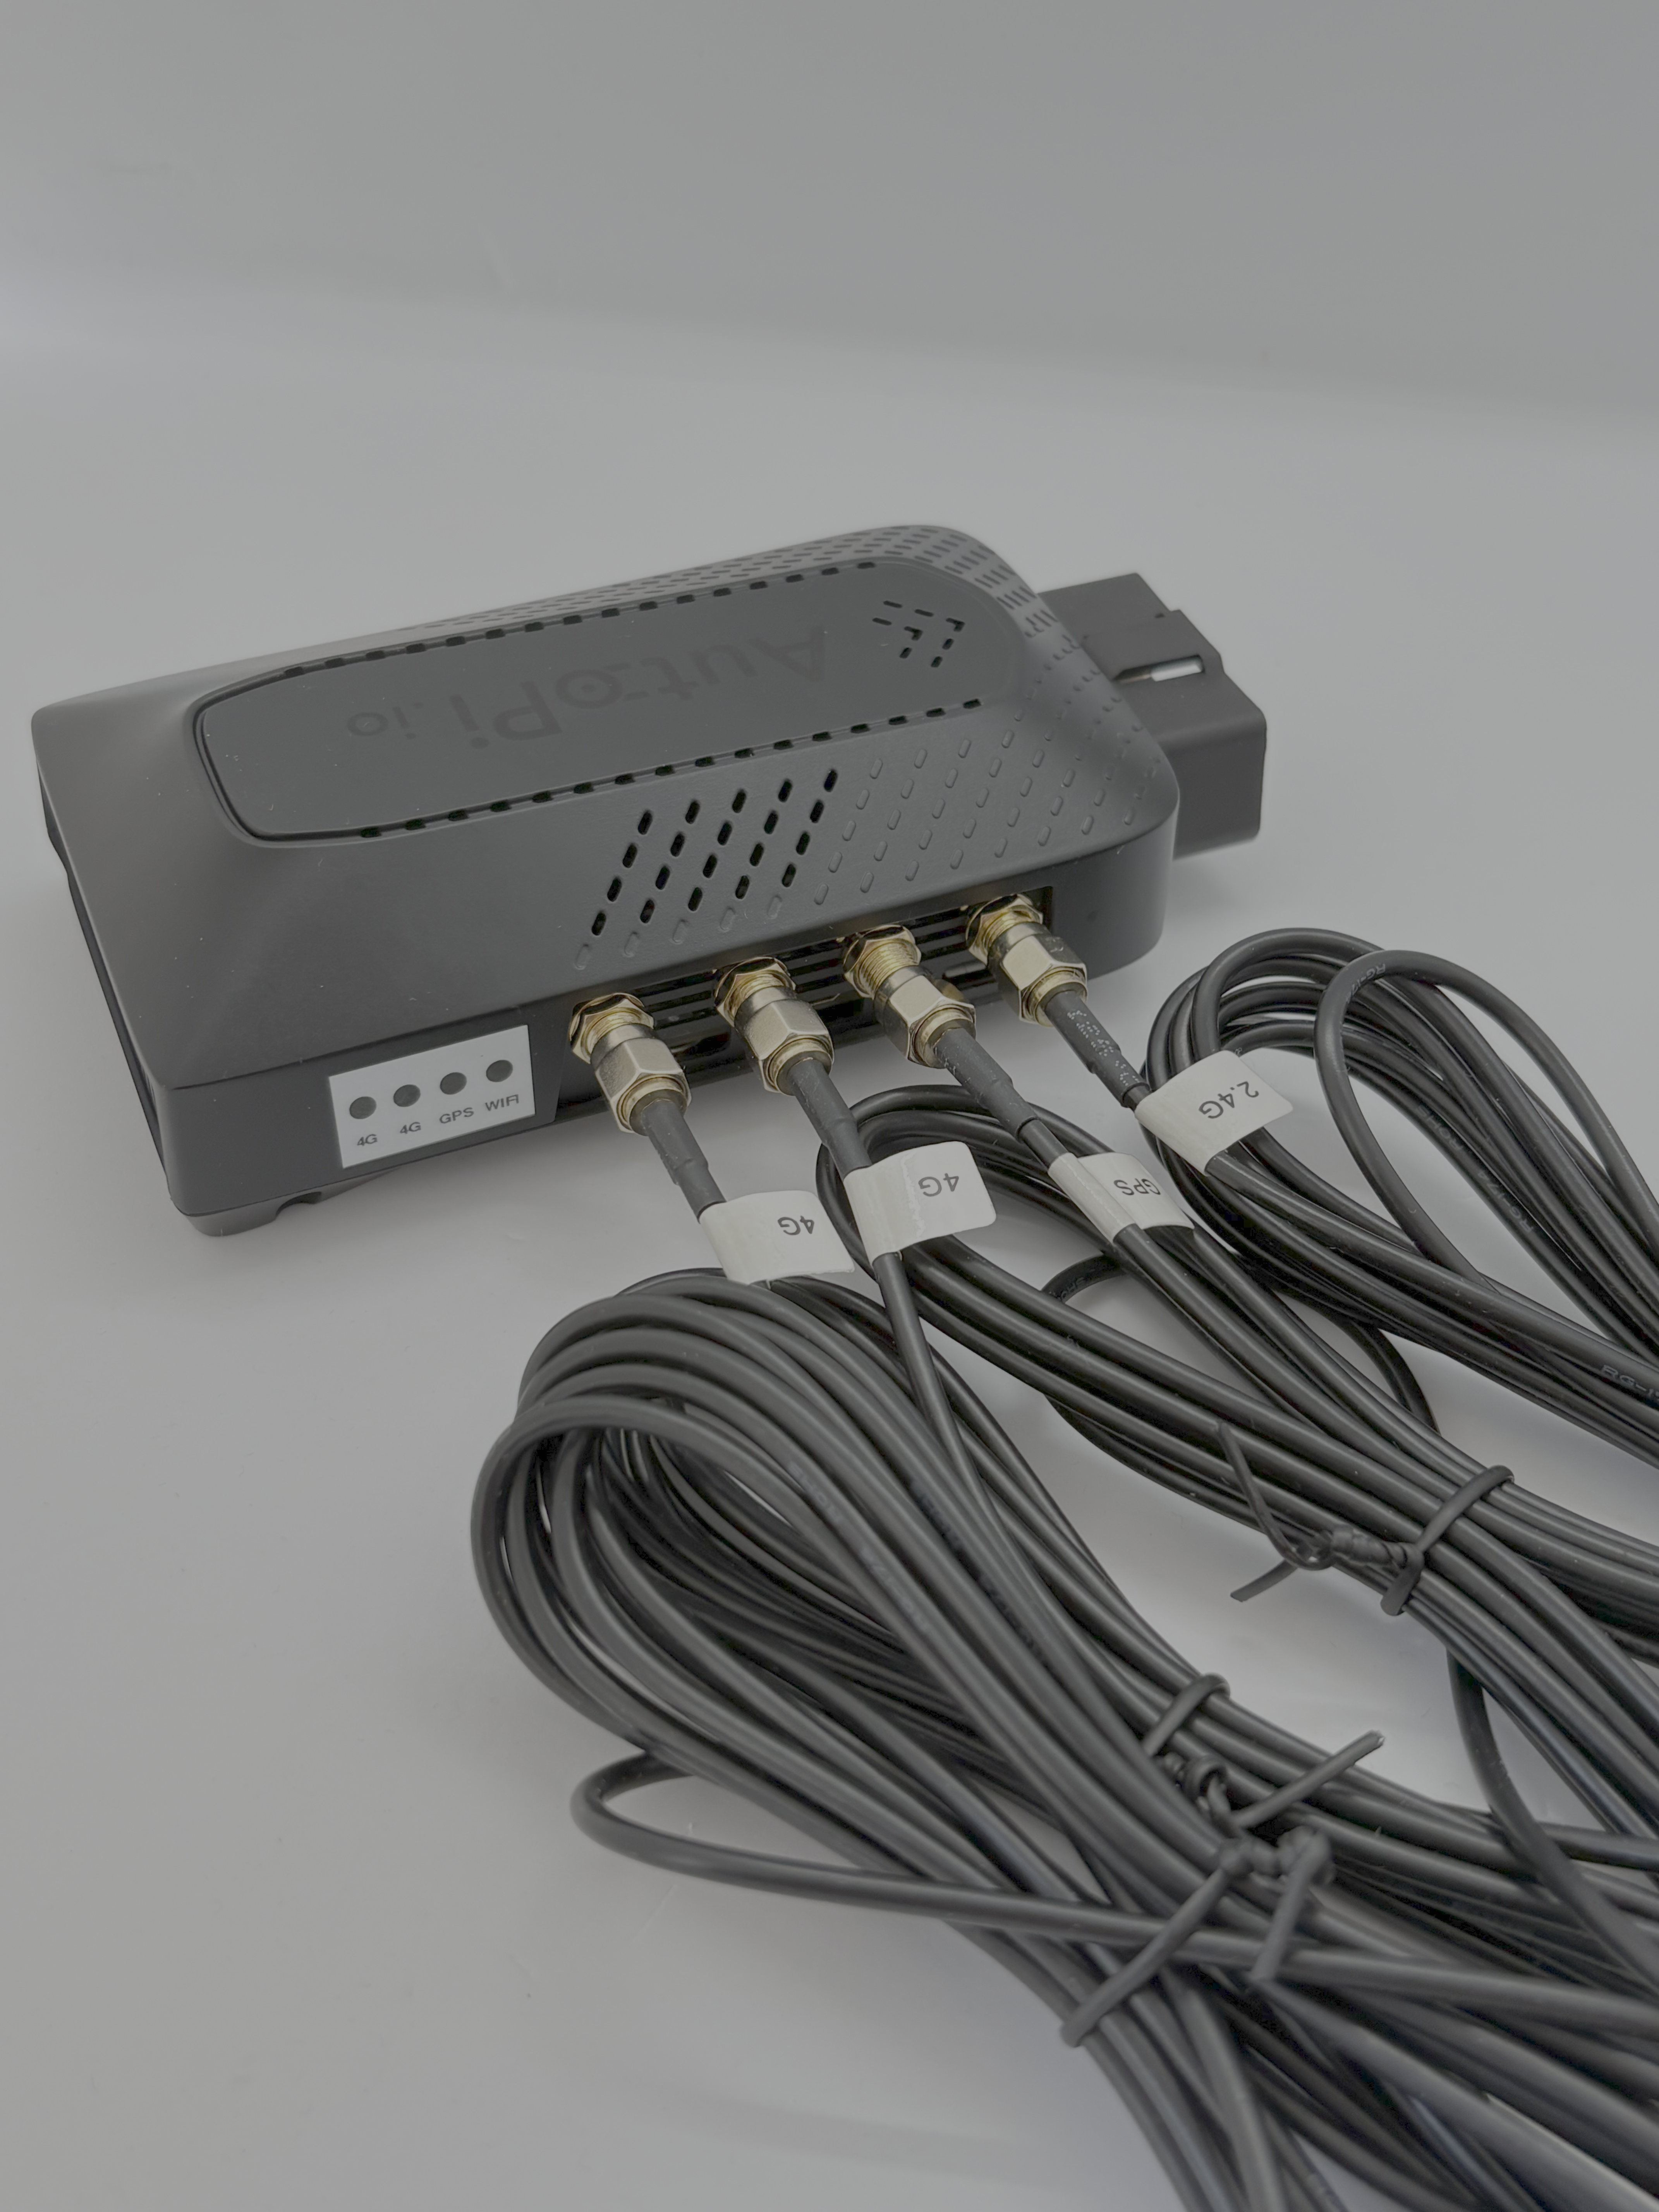
The label on the device identifies the correct port for each antenna. The external antenna kit includes:
- Two 4G antennas
- One GPS antenna
- One 2.4 GHz Wi-Fi antenna
Use the label to match each antenna to its port, then screw each antenna into place by hand. Tighten the antennas until they are secure, but do not use tools or overtighten them.
Before powering on the AutoPi CAN-FD Pro, verify that every antenna is connected securely to its correctly labeled port. Do not power on or bring the device online unless the complete external antenna kit is attached.
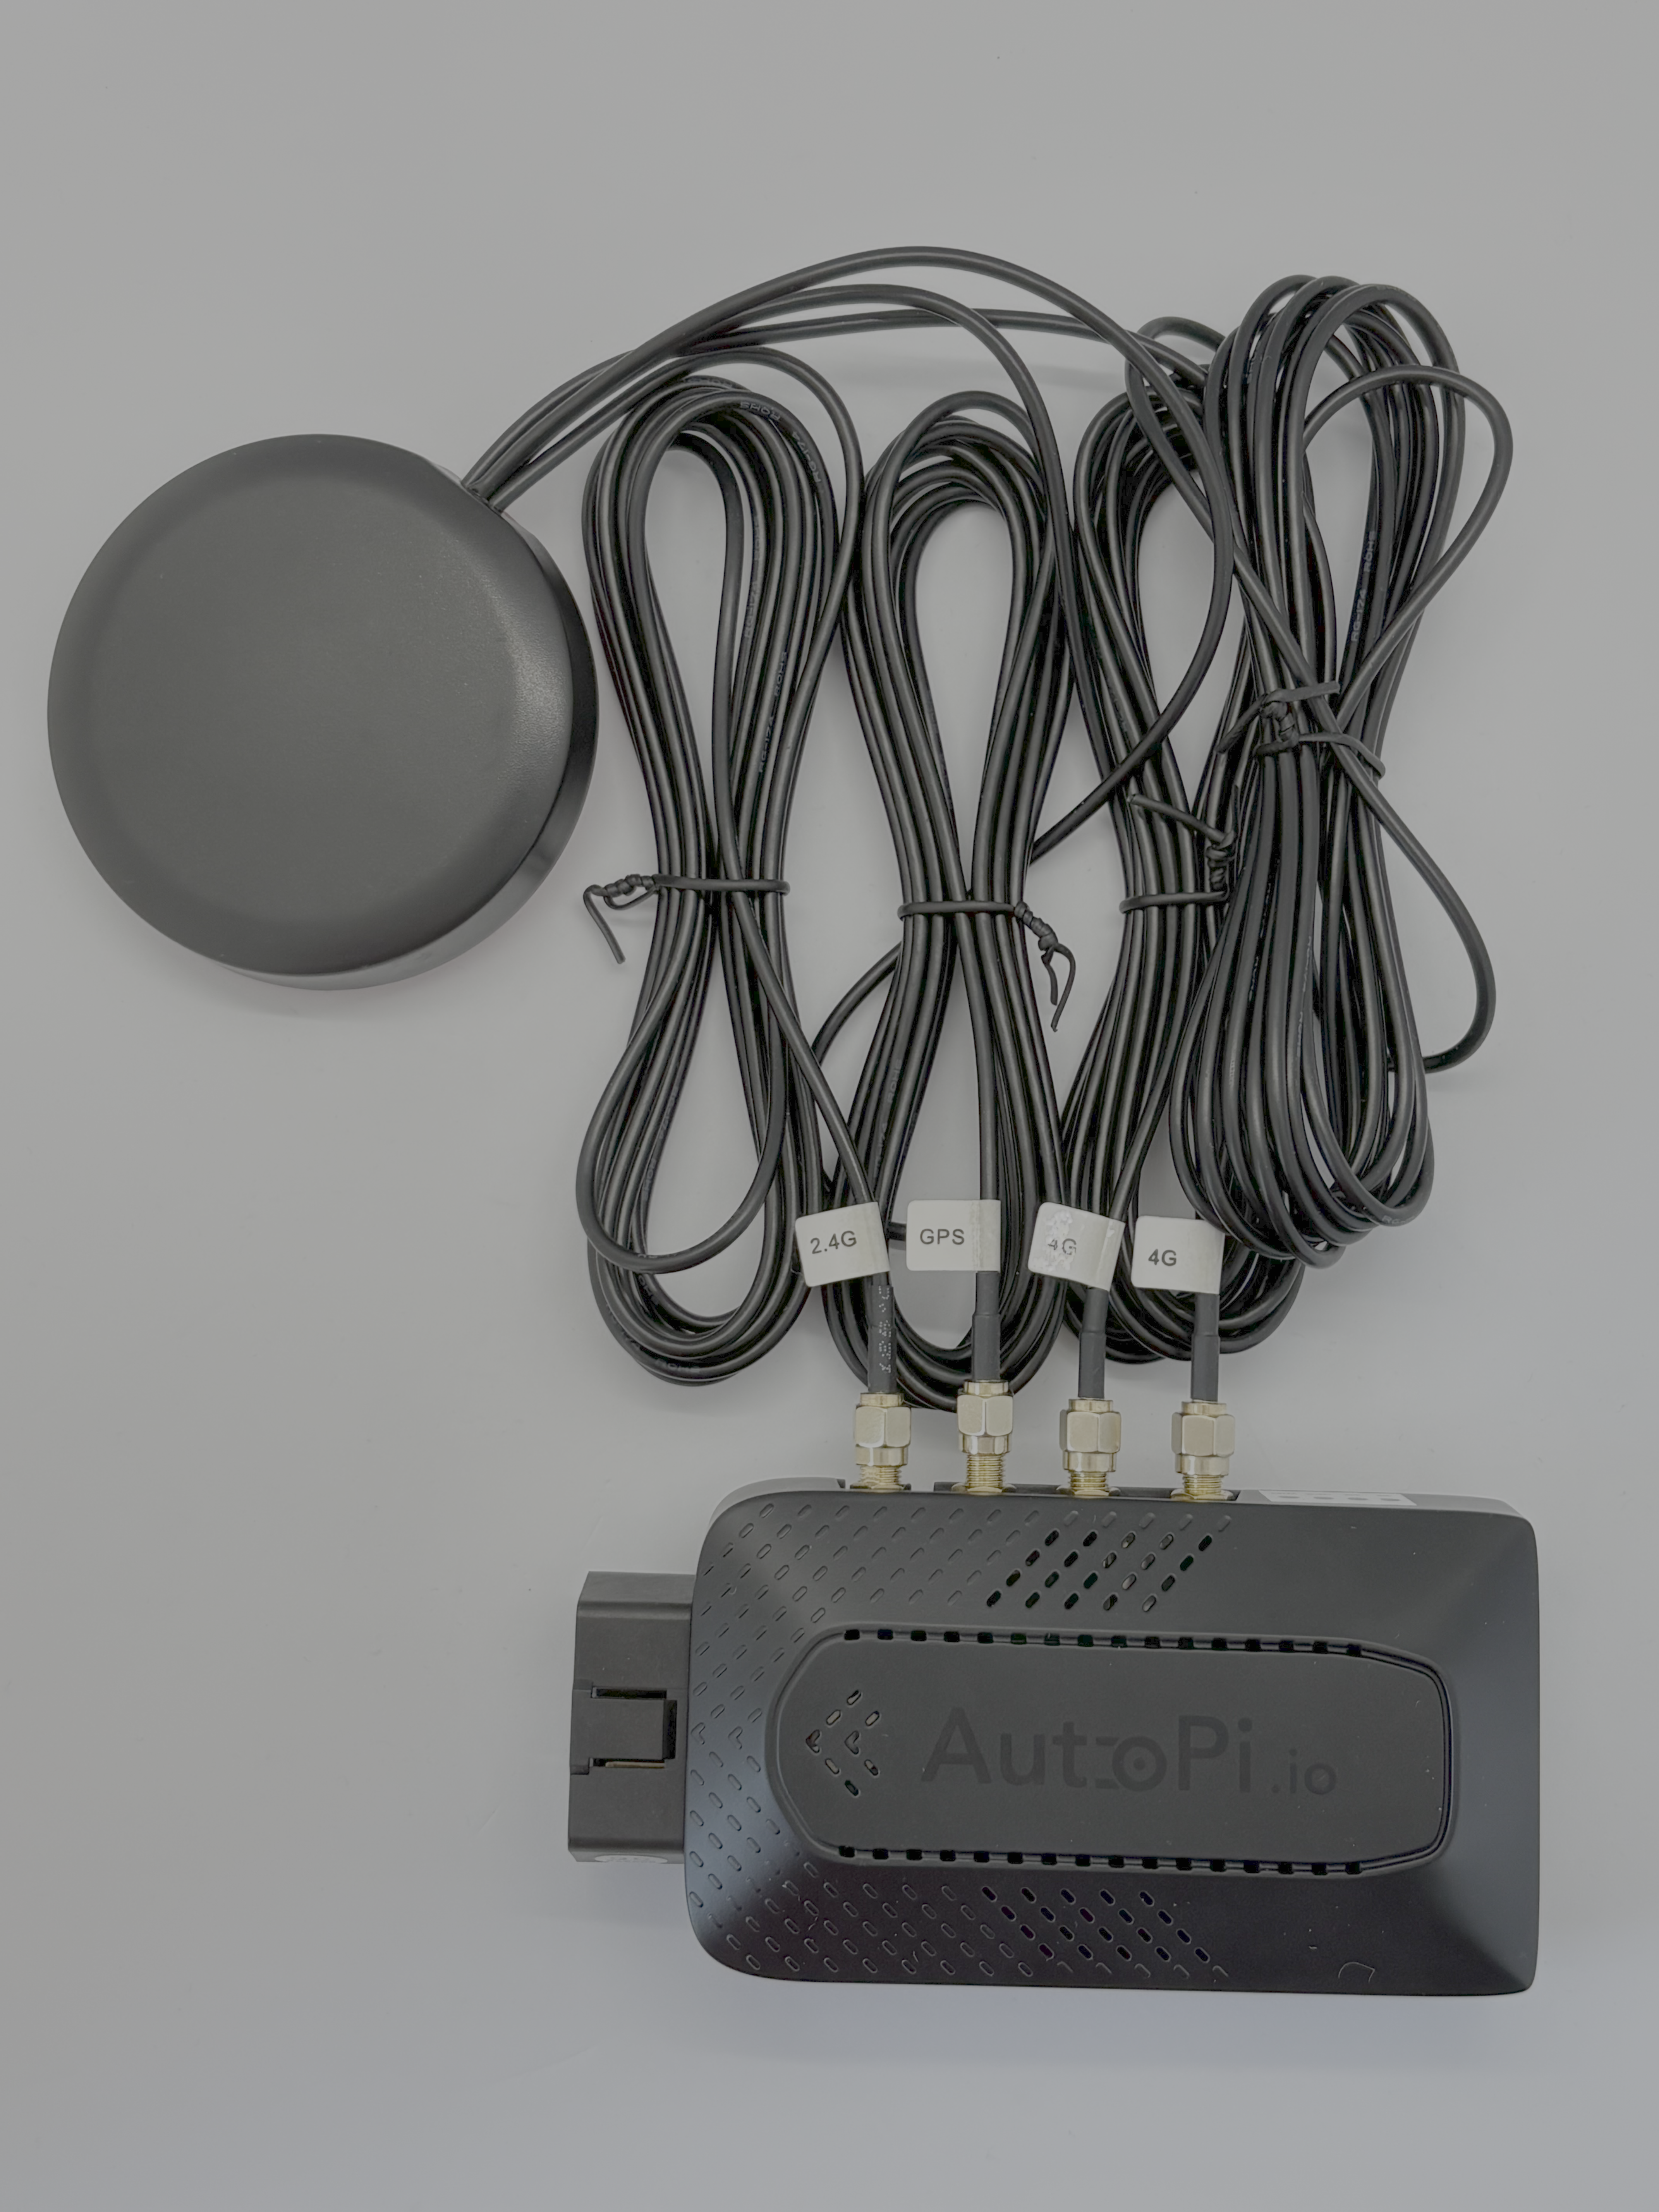
Without the external antenna kit:
With the external antenna kit:
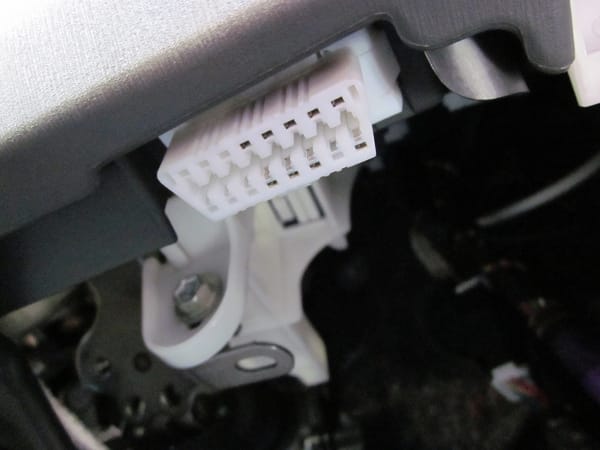
5. Locate the OBD-II Port
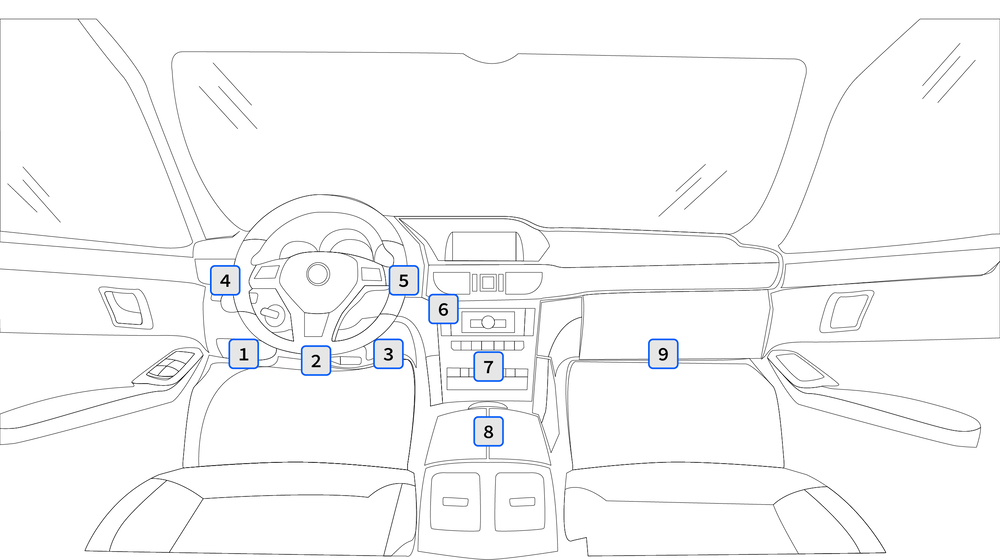
Locate the OBD-II port before installing the device. The port is usually underneath the dashboard and looks like this:
Its exact location depends on the vehicle or equipment. The following image shows common locations in passenger vehicles. If you cannot find the port, consult the owner's manual.
6. Install the Device
- Make sure the vehicle or equipment is completely powered off.
- Connect the AutoPi CAN-FD Pro to the OBD-II port.
- Position the device with the AutoPi logo and external antennas facing upward toward the sky.
- Secure the device so it cannot move or interfere with vehicle controls.
If the OBD-II port is difficult to reach or does not provide a safe mounting position, use an appropriate accessory from the AutoPi shop:
- OBD-II Extension Cable: Adds extra reach for flexible placement.
- Dual Lock Extreme Velcro Strip: Secures the device in a vibration-resistant position.
- OBD-II Splitter Cable: Connects the CAN-FD Pro and another OBD-II device at the same time.
- OBD-II to Dual DB9 Cable: Connects two CAN bus nodes to the CAN-FD Pro OBD-II port.
- Keep the AutoPi logo and external antennas facing the sky.
- Keep the device out of direct sunlight when possible. Excessive heat may reduce CPU performance.
- Do not cover the device or antennas with metal, because this can interfere with GPS and cellular signals.
- Use only a supported OBD-II power connection.
- Make sure the device and antennas are firmly secured before operating the vehicle or equipment.
7. Connect to the Device's Wi-Fi Hotspot
After installing the CAN-FD Pro, temporarily connect a phone or computer to its Wi-Fi hotspot. This connection allows you to access Local Administration and configure the device in the next step.
Find the Hotspot Credentials
The default hotspot credentials are:
- Network name (SSID):
autopi-XXXX, whereXXXXis the unique ID of your device. - Password: The first 13 characters of your Device ID.
You can find the Device ID in either of these locations:
- In the document attached to your shipping email.
- In the AutoPi Cloud under Devices > Select your device > Overview > Device specifications widget.
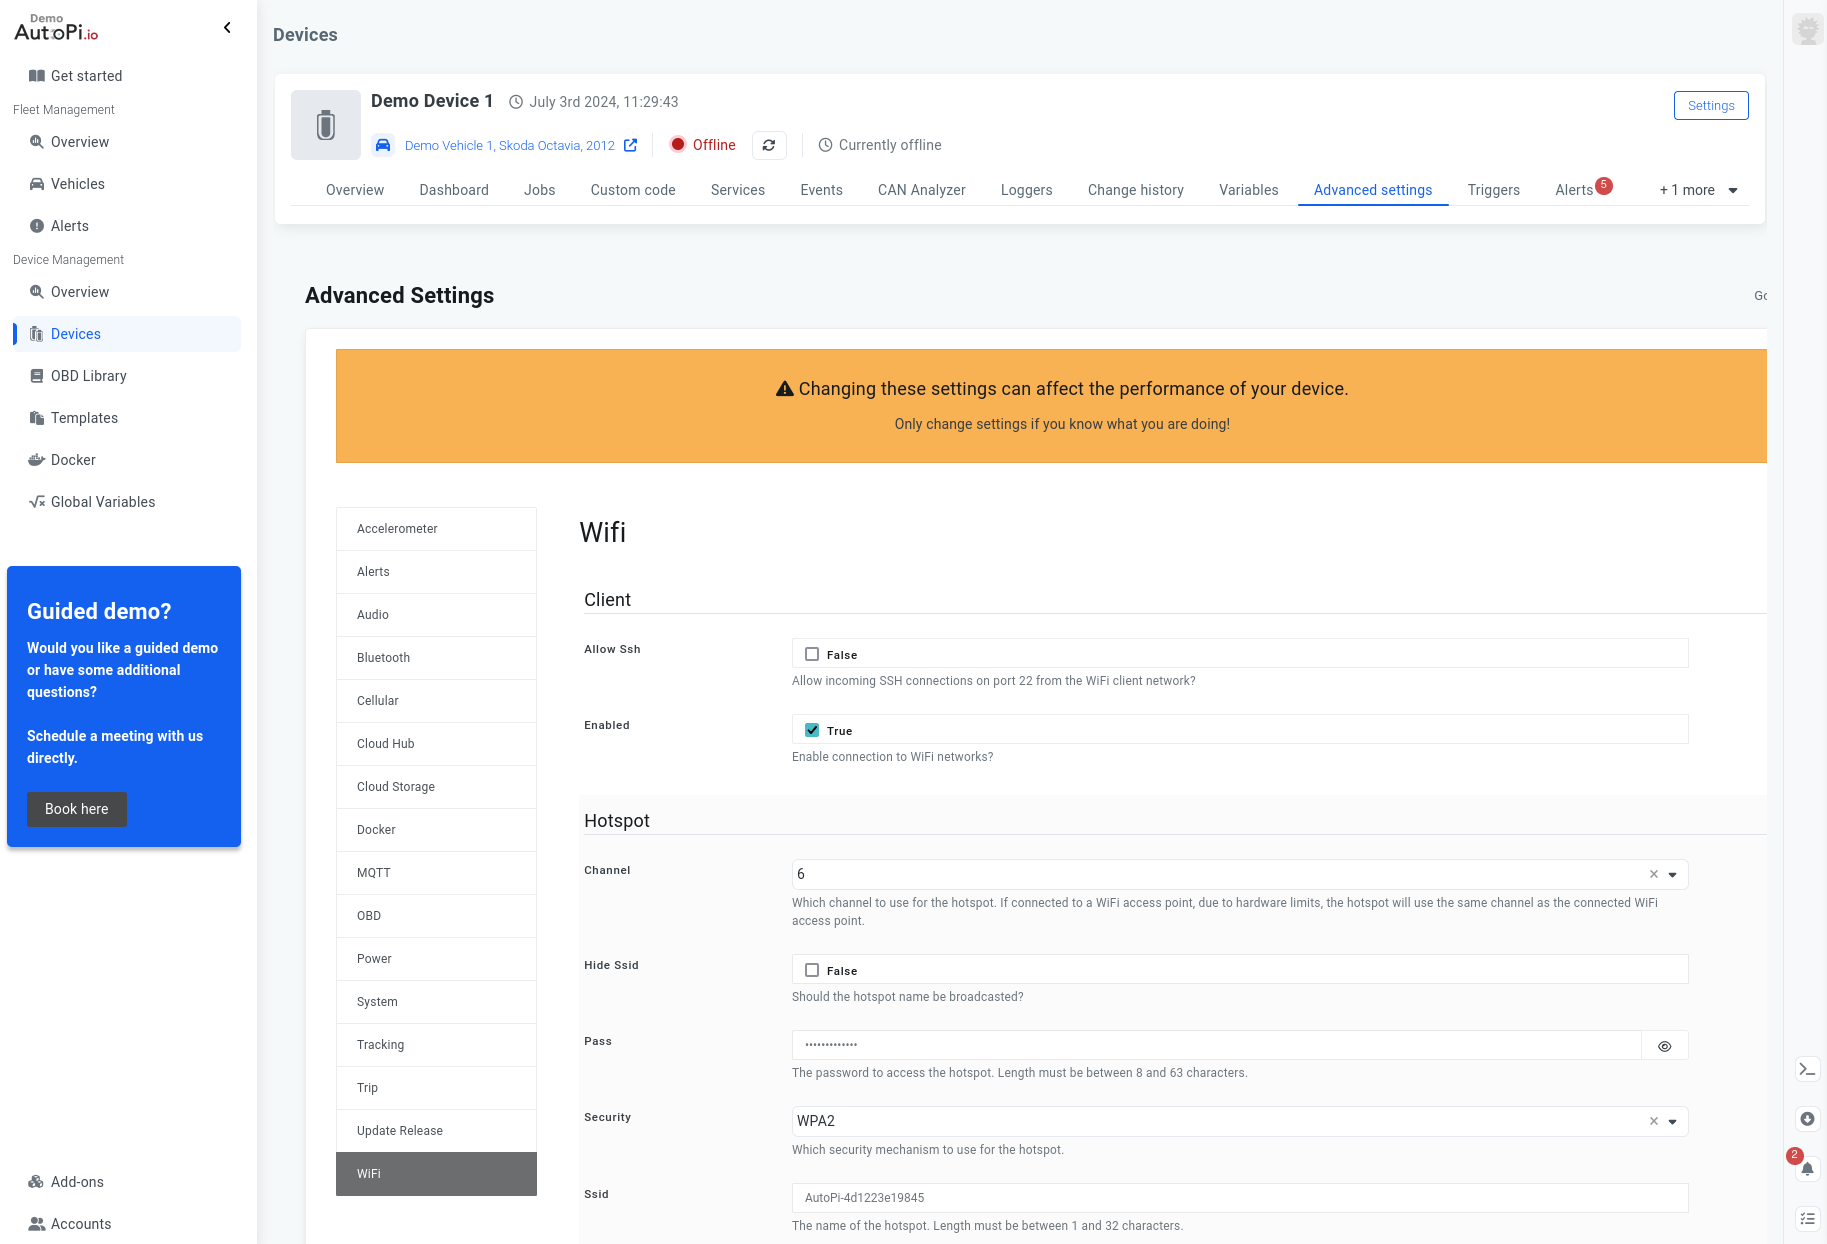
You can also view the hotspot name and password under Devices > Select your device > Advanced Settings > Wi-Fi.
Connect to the Hotspot
- Turn on the vehicle or equipment to supply power to the CAN-FD Pro.
- Wait for the blue status light to appear. This indicates that the device has power.
- Open the Wi-Fi settings on your phone or computer.
- Select the
autopi-XXXXnetwork. - Enter the hotspot password.
- Confirm that your phone or computer is connected to the hotspot.
Your phone or computer may report that the Wi-Fi network has no internet connection. Remain connected so you can access Local Administration in the next step.
Check the Status Lights
- A blue light indicates that the device has power.
- A green light indicates that the device is connected to the AutoPi Cloud.
- A flashing green light indicates that the device has not yet connected to the AutoPi Cloud.
For more information, see LED and Button States on AutoPi CAN-FD Pro.
8. Configure the APN in Local Administration
If your AutoPi CAN-FD Pro includes a monthly cloud subscription, its SIM card and APN are already configured. The APN string for the pre-installed SIM card is nxt20.net. You can skip the configuration steps below and continue to Step 9.
The pre-installed SIM card has a monthly data limit. Avoid using the AutoPi hotspot for regular internet access from a phone or computer.
If you use a Verizon Wireless SIM card, follow the dedicated setup guide: Setting Up Your Device with Verizon Wireless.
If you installed your own SIM card, ask your mobile provider for the correct APN string before continuing. APN settings vary by provider, and an incorrect value will prevent the device from establishing a cellular connection.
Open Local Administration
Remain connected to the AutoPi Wi-Fi hotspot from Step 7, then:
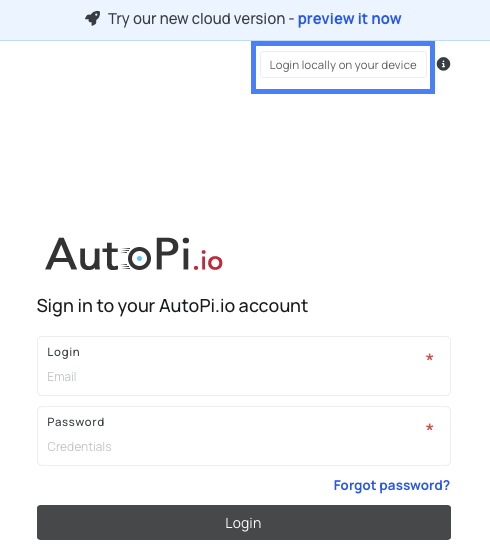
- Go to my.autopi.io. If you are already signed in, sign out.
- Select Login locally on your device in the upper-right corner. Alternatively, go directly to local.autopi.io.
- Confirm that the page indicates you are connected to a local device.
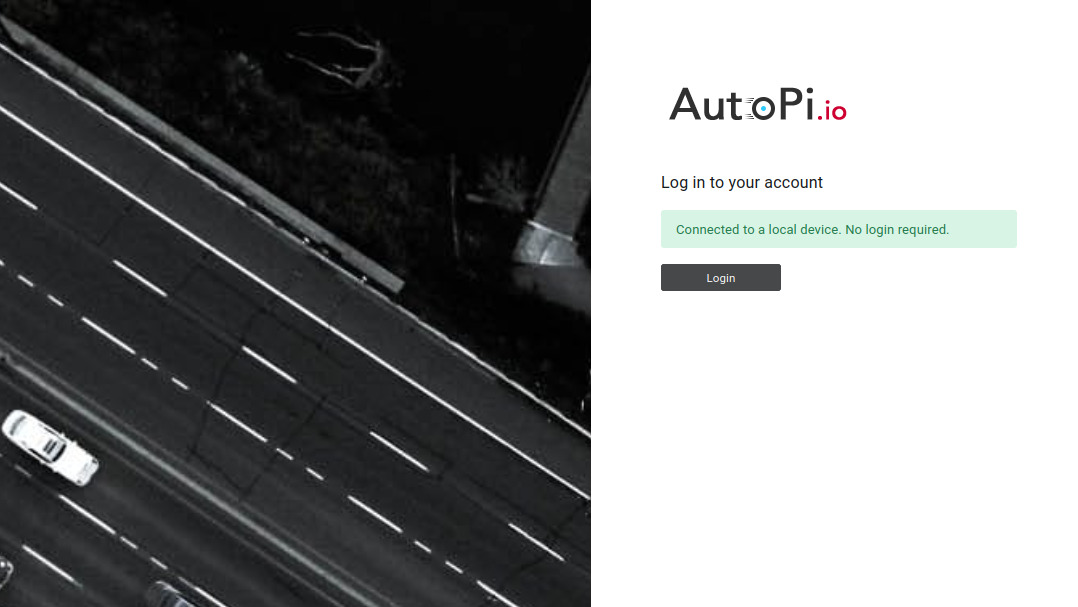
- Select Login. A username and password are not required for local access.
Configure the 4G/LTE Settings
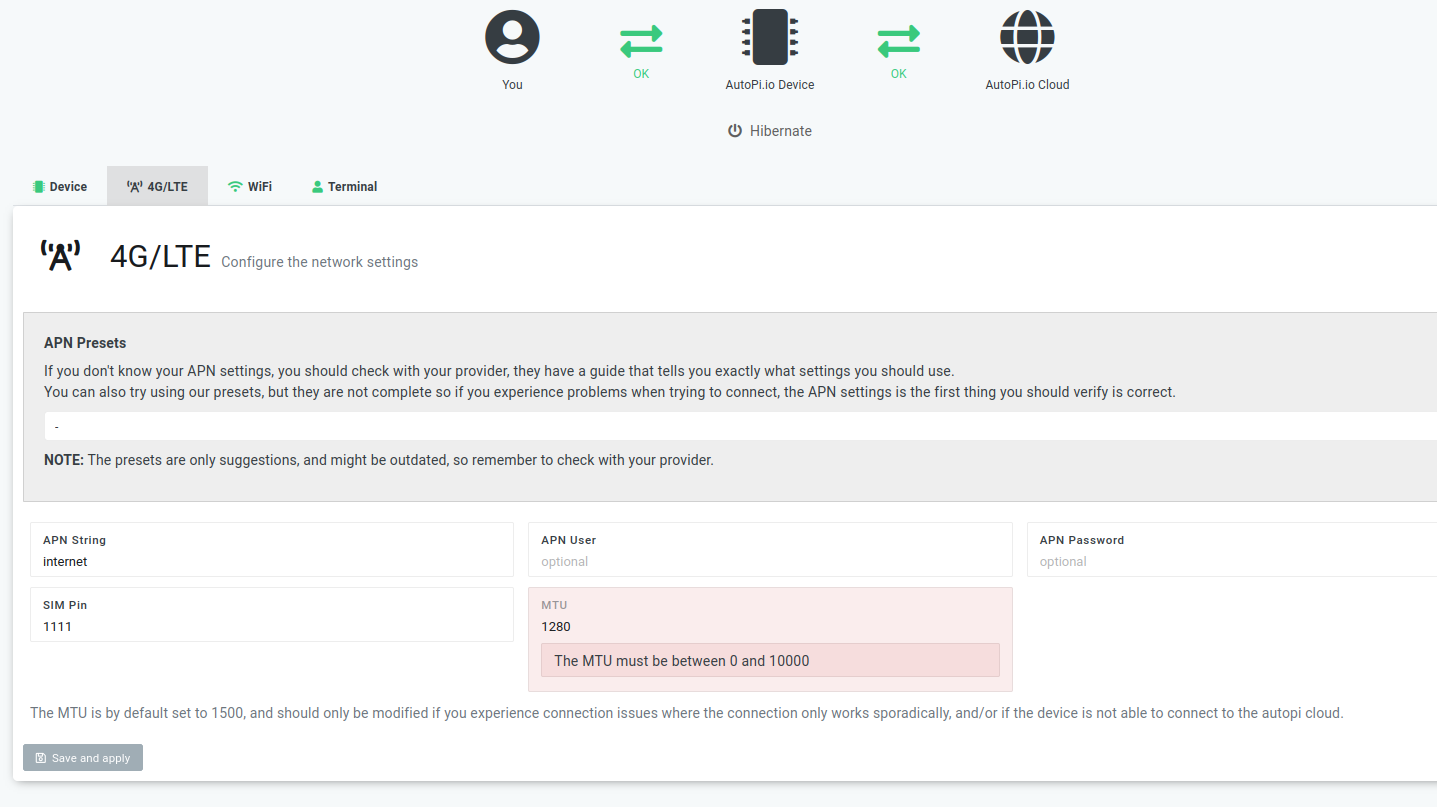
- Open the 4G/LTE tab.
- In the APN String field, replace the existing APN string with the value provided by your mobile provider.
- If the SIM card has a PIN, enter it in the SIM PIN field. Otherwise, leave this field empty.
- Keep MTU set to its default value of 1280.
- Select Save and apply.
- Wait for the success notification before leaving the page.
- Continue to Step 9 to verify the connection.
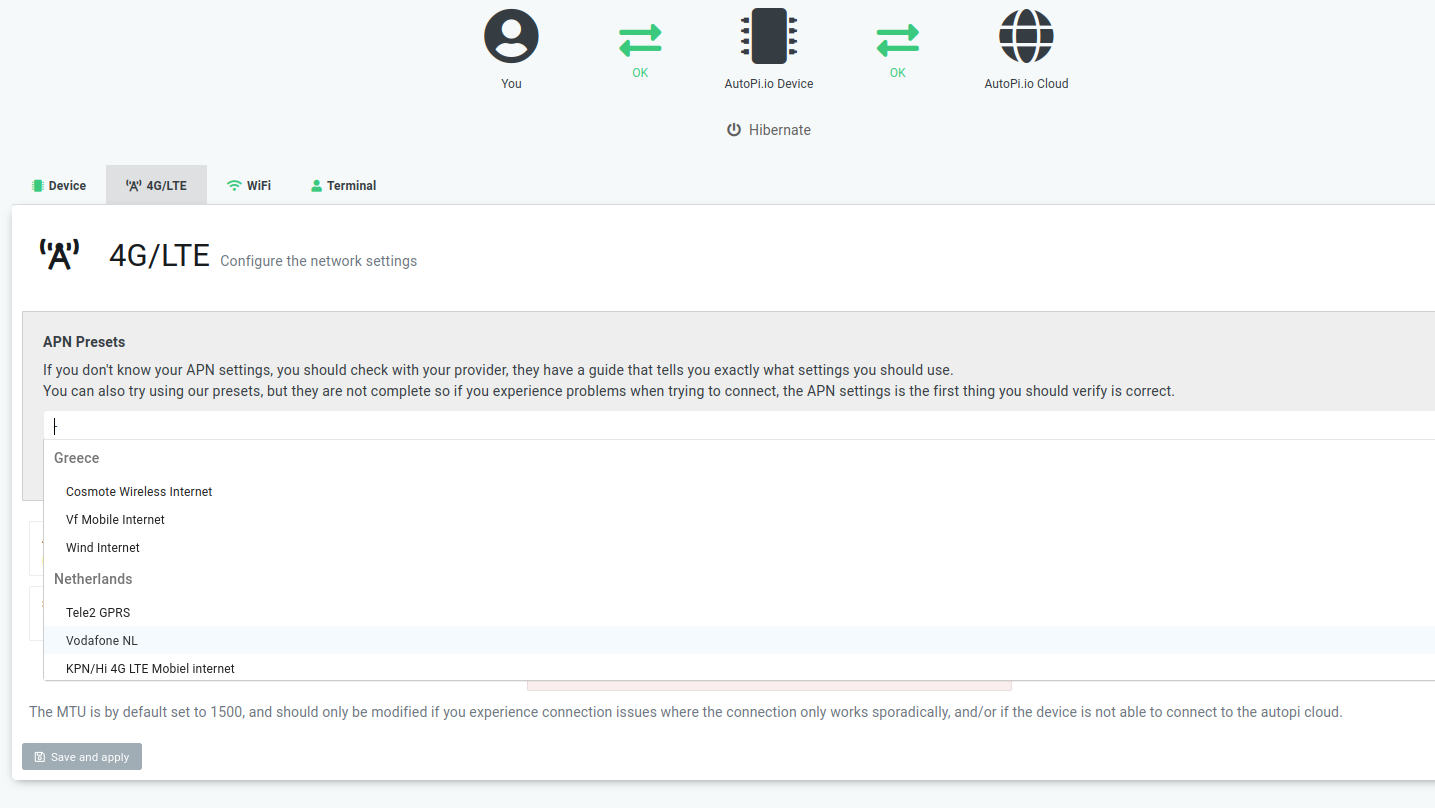
Optional: Use an APN Preset
You can select a provider from APN Presets at the top of the 4G/LTE tab. Presets are provided for convenience, but they are not guaranteed to work for every SIM card or subscription. Confirm the APN string with your mobile provider and verify that the preset entered the correct value.
9. Verify Connectivity
Verify both the cellular internet connection and the AutoPi Cloud connection:
- Keep your phone or computer connected to the AutoPi Wi-Fi hotspot.
- Open a browser and visit a public webpage.
- Confirm that the webpage loads. This verifies that the APN settings are correct and the device has internet access.
- Check the green status light on the CAN-FD Pro:
- A steady green light indicates that the device is connected to the AutoPi Cloud.
- A flashing green light indicates that the device has not yet connected to the AutoPi Cloud.
- Sign in to the AutoPi Cloud and confirm that the device appears online.
The first cellular connection may take a few minutes. If a webpage does not load or the device does not appear online, confirm the APN string and SIM PIN with your mobile provider. Then return to Step 8, update the settings, and test the connection again.
10. Finalize the Setup
After verifying connectivity, replace the default Wi-Fi hotspot password:
- In the AutoPi Cloud, open Devices and select your CAN-FD Pro.
- Go to Advanced Settings > Wi-Fi.
- Enter a secure password in the Pass field.
- Save and apply the change.
- Store the new password in a secure location.
Your phone or computer may disconnect from the hotspot after the password changes. Use the new password if you need to connect again.
To avoid unnecessary cellular data usage, disconnect phones, tablets, and computers from the AutoPi hotspot after completing the setup.
11. Set Up Output Handlers
Configure an output handler to choose where the CAN-FD Pro sends captured data. The device currently supports output to an Amazon S3 bucket. Follow Amazon Web Services (AWS) S3 Bucket Creation to configure the destination.
12. Access Files Remotely on AutoPi
You can view and manage captured data remotely by using SFTP or SCP. Follow Accessing Files via SFTP/SCP on AutoPi to configure access.
Review the sleep timer settings and adjust them for your use case under Advanced Settings > Power > Sleep Timer. By default, the device enters sleep mode when it receives this event:
^vehicle/battery/(discharging|unknown).
The device remains awake while any of these events are active:
^vehicle/battery/(charging_slow|charging|overcharging).
Setup Complete
Your AutoPi CAN-FD Pro is connected to the AutoPi Cloud and ready to capture and transmit data. Operate the vehicle or equipment to begin collecting data, then confirm that the configured output handler receives it.
What's Next?
Now that the device is running, you can:
- Learn about CAN-FD Pro features: read the CAN-FD Pro User Guide.
- Explore the AutoPi Cloud: try real-time monitoring, analytics, and configurable alerts in the AutoPi Cloud.
- Read more documentation: learn about advanced features and troubleshooting on the AutoPi documentation site.
- Create nested accounts and invite users: learn how AutoPi Cloud securely separates data, configurations, and access for multiple accounts in Account Management.
 Shop AutoPi devices
 Compare devices
 Contact sales
 Contact support