Power Cycles
By default, an AutoPi device uses engine RPM events to determine whether a vehicle is running. When the engine stops, the device starts a sleep timer and enters sleep mode after the configured delay, which is five minutes by default.
This behavior relies on engine events generated from RPM values read through the standard OBD-II PID defined by SAE J1979. Most vehicles with an internal combustion engine support this PID, but battery electric vehicles (BEVs) do not use a standardized method for reporting motor activity.
For a BEV, choose a configuration based on the data available from the vehicle:
- Use an RPM PID if the vehicle responds to PID requests with a value that represents movement.
- Use a communication PID if the vehicle responds only while it is active.
- Use a CAN signal if the vehicle continuously transmits an RPM value while it is active.
Check the OBD Community Library if you do not know which PID or CAN signal is available for your vehicle.
Set Up an RPM PID Using the rpm_motor_event Trigger
Use this method when the vehicle responds to a PID request with an RPM value that represents movement, such as electric motor or wheel speed.
The device configuration differs between AutoPi TMU CM4 and AutoPi CAN-FD Pro. Follow the steps for your device edition.
AutoPi TMU CM4
The standard PID logger workflow described in this section applies only to AutoPi TMU CM4. Before continuing, add a PID that returns a movement-related RPM value to your OBD Library.
To create the RPM PID logger:
- Open the TMU CM4 device in the AutoPi Cloud.
- Go to Loggers > Create > PID.
- Select the RPM PID.
- Select the
rpm_motor_eventtrigger. - Save the logger and sync the changes to the device.
- Restart the associated service when prompted.
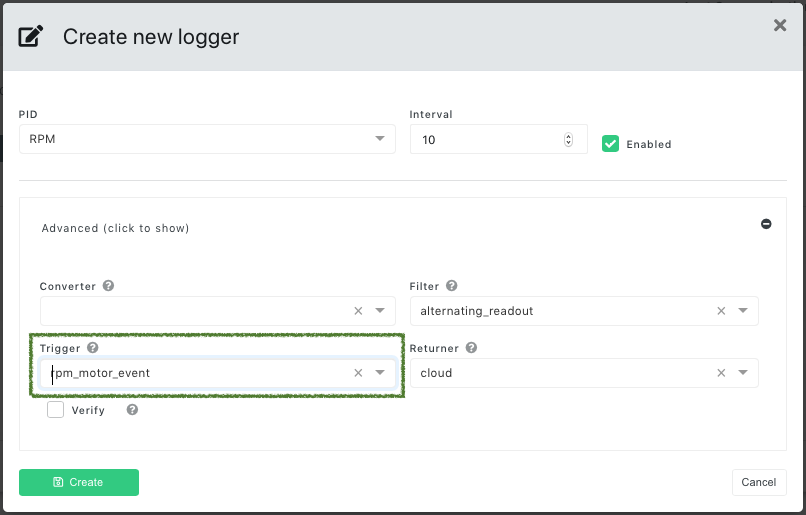
Name the PID RPM. The rpm_motor_event trigger ignores values from PIDs with other names.
After the logger has been synced to your device, and the service has been restarted, you should start seeing motor events on the Events page. For more information, see Motor Events.
AutoPi CAN-FD Pro
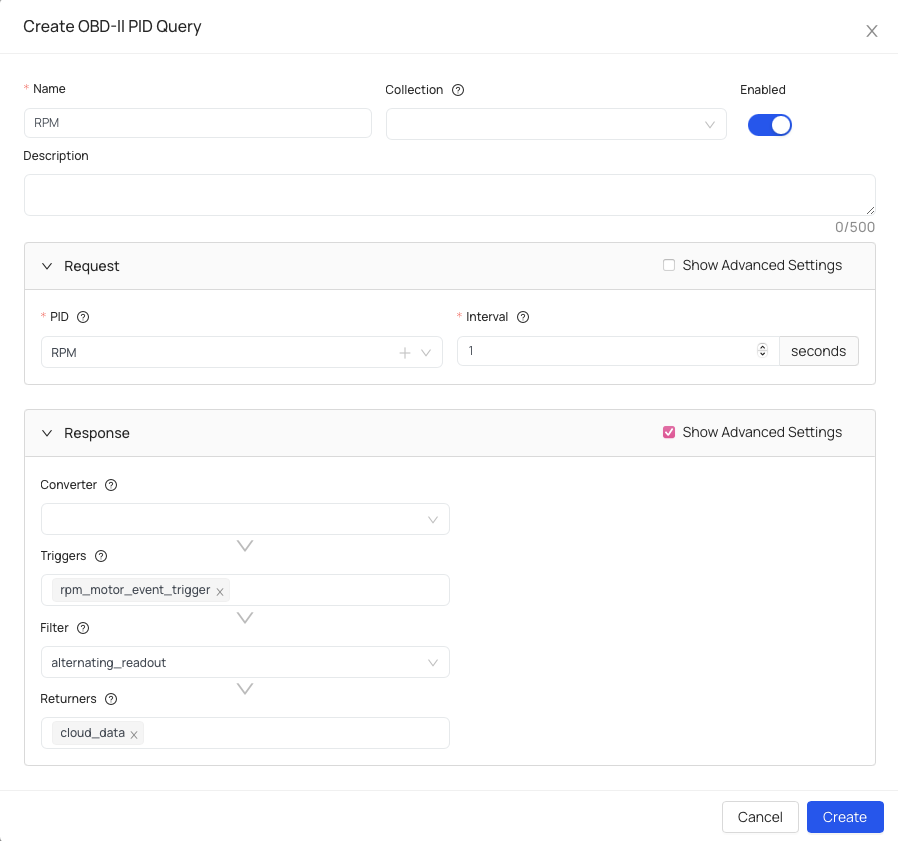
AutoPi CAN-FD Pro uses an OBD-II PID query in CAN Logging instead of the standard PID logger workflow used by AutoPi TMU CM4.
- Open the CAN-FD Pro device in the AutoPi Cloud.
- Go to CAN Logging and open Queries.
- Select Add Query > OBD-II PID.
- Configure the required PID request.
- Under Response, enable Show Advanced Settings.
- Under Triggers, select
rpm_motor_event_trigger. - Save the query and apply the changes to the device.
Set Up a PID Logger Using the communication_event Trigger
Use this TMU CM4 method when the vehicle does not provide movement-related RPM data but does respond to another PID while active. The response value itself does not affect the trigger.
The PID must return data while the vehicle is active and stop responding while the vehicle is inactive. Unlike the RPM method, this PID does not require a specific name.
To read more about communication events, click here: Communication Events.
Create the PID Logger
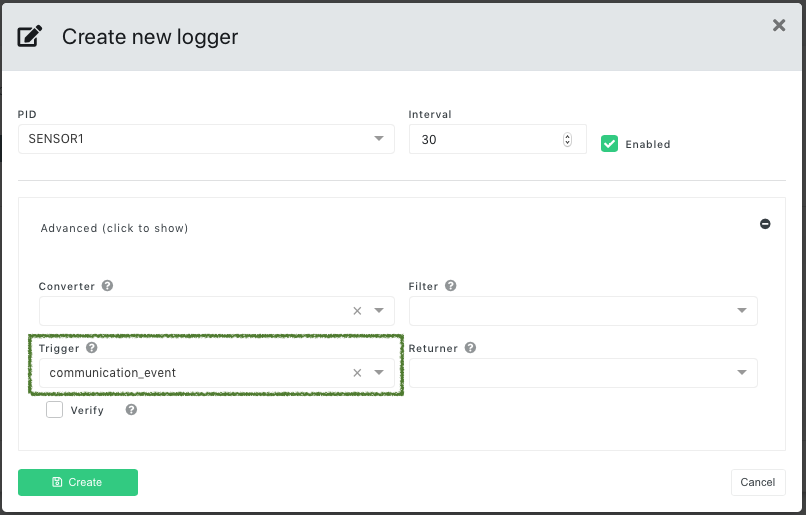
- Open the TMU CM4 device in the AutoPi Cloud.
- Go to Loggers > Create > PID.
- Select a PID that responds only while the vehicle is active.
- Select the
communication_eventtrigger. - Save the logger and sync the changes to the device.
- Restart the associated service when prompted.
Configure the Sleep Timer
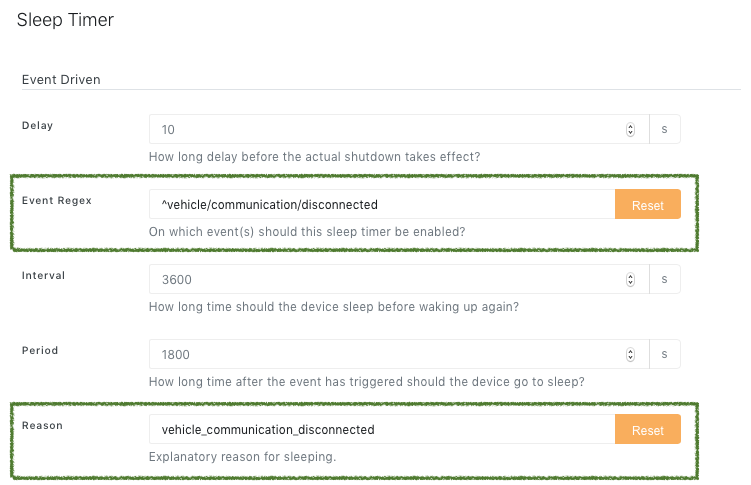
Configure the sleep timer to use communication events instead of engine or motor events:
- Go to Advanced Settings > Power > Sleep Timer > Event Driven.
- Set Event Regex to
^vehicle/communication/disconnected. - Set Reason to
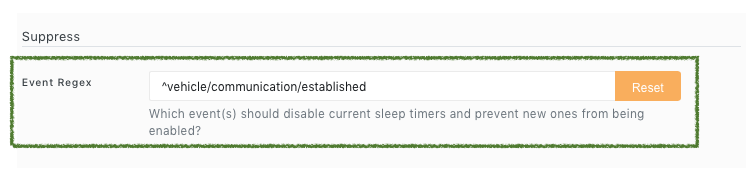
vehicle_communication_disconnected. - Go to Sleep Timer > Suppress.
- Set Event Regex to
^vehicle/communication/established. - Save the settings and sync the changes to the device.
After applying the configuration, open Events for the device. Confirm that communication events
and system/sleep_timer events appear when the vehicle changes between active and inactive states.
Set Up a PID Logger Using a Custom Trigger
If the built-in triggers do not meet your requirements, create a custom trigger and select it when you configure the PID logger. For implementation and configuration details, see Create Custom Triggers.
Custom triggers are intended for advanced users who can develop and validate custom event logic.
Set Up a TMU CM4 CAN Logger Using the rpm_engine_event Trigger
Use this TMU CM4 method when the vehicle continuously transmits an RPM signal on the CAN bus while active. This workflow generates engine events.
Before continuing, obtain a CAN message mapping for the vehicle that contains an RPM signal. Check the OBD Community Library if you do not have a mapping.
Name the CAN signal RPM. The rpm_engine_event trigger ignores values from signals with other
names.
- In the AutoPi Cloud, go to OBD Library > Community Library.
- Filter the library by vehicle make and locate an RPM signal.
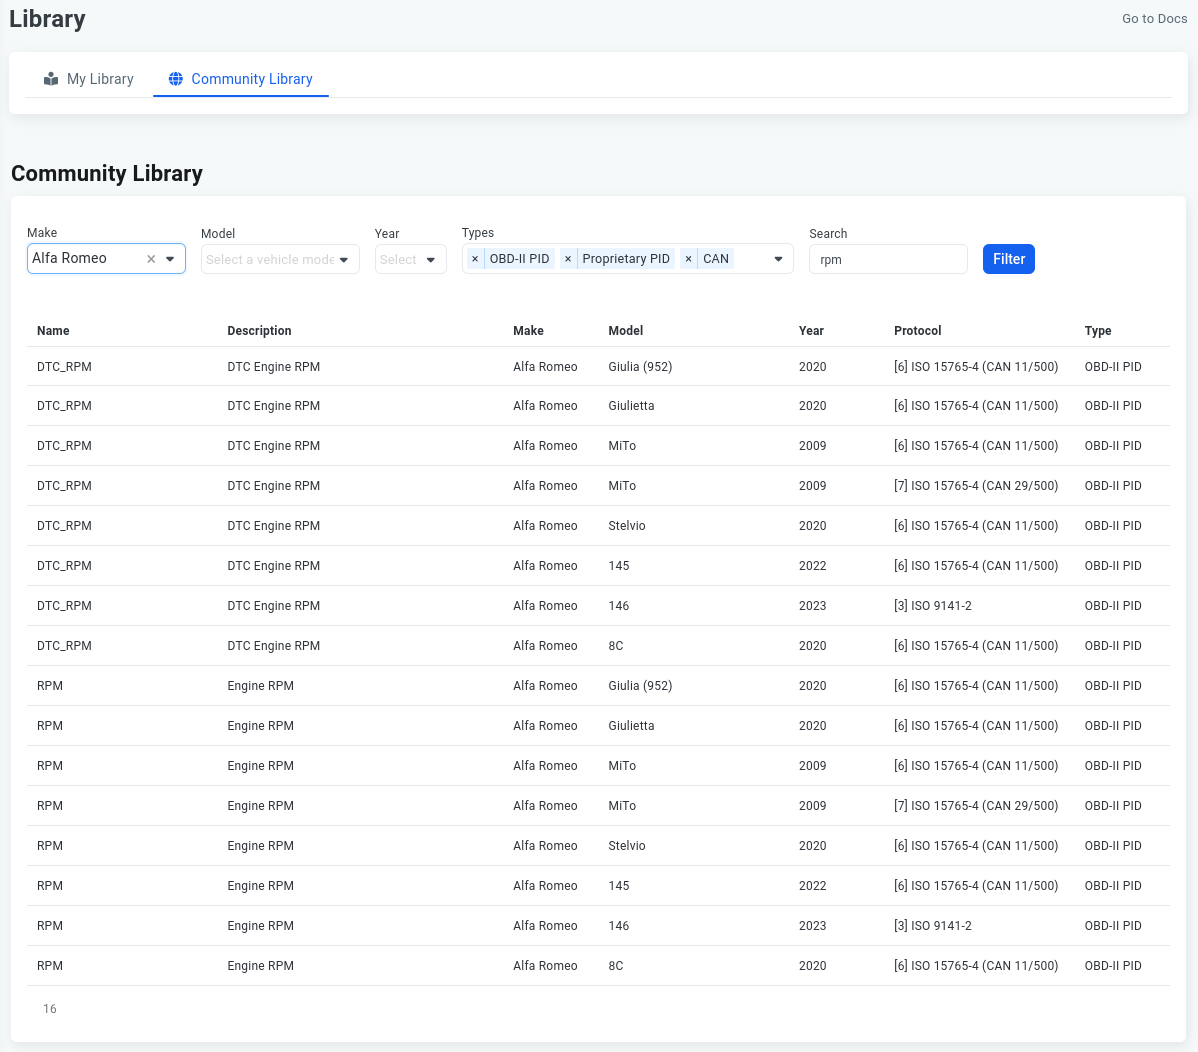
- Open the signal and select Add to my library.
- Open the TMU CM4 device and go to Loggers > Create > CAN.
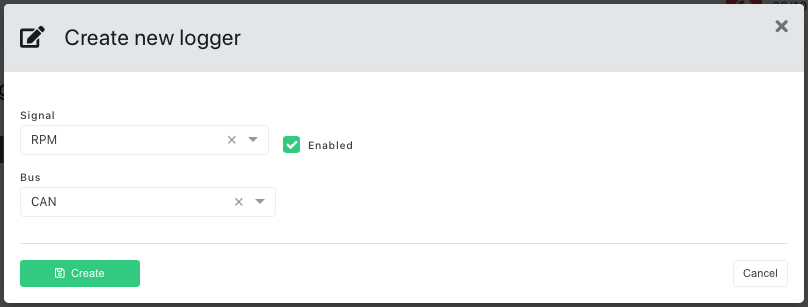
- Select the RPM signal and the
rpm_engine_eventtrigger. - Save the logger and sync the changes to the device.
- Restart the associated service when prompted.
After applying the configuration, safely test the vehicle and open Events for the device. Confirm that engine events appear when the vehicle becomes active and inactive.
 Shop AutoPi devices
 Compare devices
 Contact sales
 Contact support