Geofence Summary Report
This guide is applicable to the following device / devices:

Mini

TMU CM4

CAN-FD Pro

CAN-FD Pro +IP67 casing
The Geofence Report provides detailed insights into vehicle activity within predefined geographic areas. This report helps fleet managers:
- Track entries and exits from geofenced zones.
- Monitor unauthorized or unexpected stops.
- Evaluate route adherence and optimize routing efficiency.
List Tab
- Access a list of all generated Geofence Reports. The list includes:
- The creation date of each report.
- The report name (editable during creation).
- The report type (e.g., Geofence Report).
- Date range (from/to).
- The creator's name.
- Actions: Download as PDF or delete the report.
- Click on a report to open its preview.

Schedules Tab
- View all scheduled Geofence Reports, including:
- Last generated date.
- Report name.
- Schedule type (daily, weekly, or monthly).
- Frequency (time of day).
- Actions: Delete a scheduled report.

Create/Schedule Tab
Creating a Geofence Summary Report
- From the AutoPi Cloud platform, navigate to the Reports menu and click Create/Schedule.
- Select Geofence Summary from the available options.
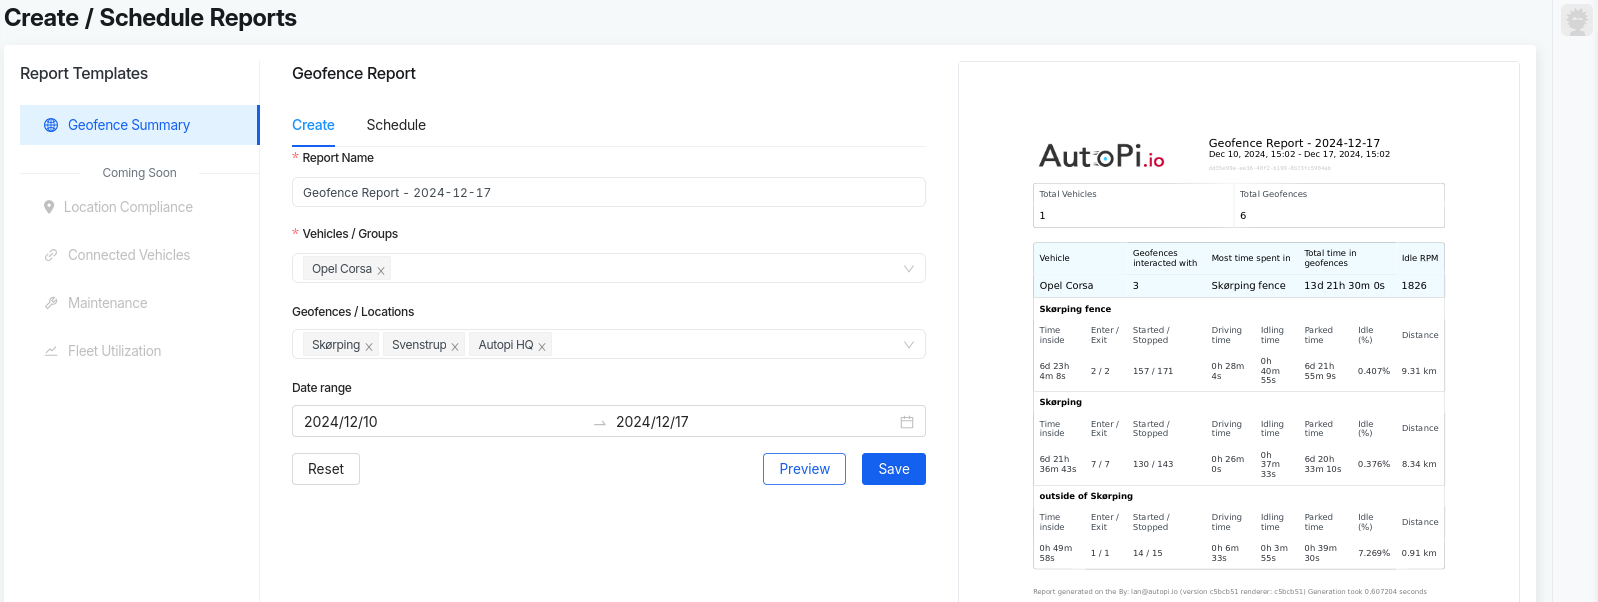
- Fill out the template:
- Report Name: Automatically generated based on the current date, but you can customize it.
- Vehicles/Groups: Select vehicles or vehicle groups to include in the report. Use the dropdown menu to pick from available options and select as many as needed.
- Geofences/Locations: Choose geofences or locations to include in the report. Use the dropdown menu to pick from available options and select as many as needed.
- Date Range: Specify the start and end dates for the report.
- Reset: Clears all configurations you’ve made.
- Preview: Allows you to see how the report will look before saving.
- Save: Saves the report and displays it under the Reports - List section.
Scheduling a Geofence Summary Report
- After generating a Geofence Summary Report, you can schedule it to run at
regular intervals (daily, weekly, or monthly):
- Scheduled reports are automatically generated and displayed under Reports - Schedules.
- To schedule a report:
- Navigate to the Reports menu and click Create/Schedule.
- If you haven’t already created a report, follow the steps above to create one.
- Click Schedule next to Create to open the scheduling window.
- Fill out the schedule template:
- Schedule Name: Automatically generated based on the frequency, but you can customize it.
- Vehicles/Groups: Select vehicles or vehicle groups for the scheduled report.
- Geofences/Locations: Choose geofences or locations to include in the report.
- Report Frequency: Select Daily, Weekly, or Monthly (one option at a time).
- Time of Report Generation: Set the time you want the report to be generated.
- Reset: Clears all configurations you’ve made.
- Preview: Allows you to see how the scheduled report will look.
- Save: Saves the scheduled report and displays it under Reports - Schedules.

How fields in the geofence report are calculated
The fields in the Geofence Report are generated using data collected from GPS locations, accelerometer readings, and other device events. Below is a breakdown of how each field is calculated:
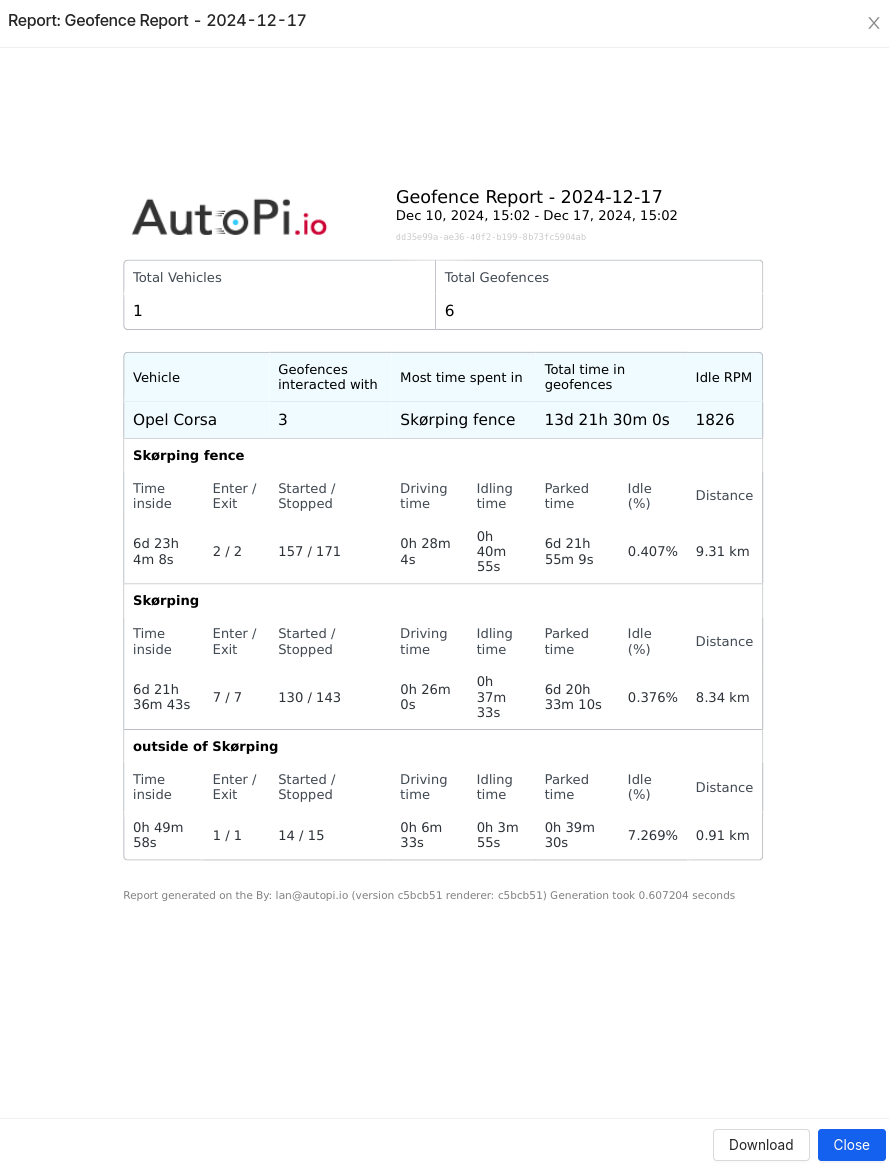
- Total vehicles: Displays the total number of vehicles selected when creating the report.
- Total geofences: Shows the total number of geofences selected during report creation.
- Geofences interacted with: Shows how many of the selected geofences any of the selected vehicles has interacted with, this is a subset of Total Geofences.
- Most time spent in: Identifies the geofence where a vehicle spent the
most time. This is calculated by measuring the duration between vehicle
enter and exit events for each geofence.
- Detailed information, such as total time spent, number of entries, and exits, is available in the report fields below.
- Total time in geofences: The cumulative time for each selected vehicles spent inside any selected geofence.
- Time inside: For each geofence, this field shows the total time a vehicle spent within that geofence. It is calculated as the sum of all durations between entry and exit events.
- Enter/Exit: This field counts how many times a vehicle entered and exited
a specific geofence. It is determined based on:
- Entry events: Recorded as
vehicle/geofence/*/enter. - Exit events: Recorded as
vehicle/geofence/*/exit. - You can view these events under Device -> Events and apply the relevant filters.
- Entry events: Recorded as
- Started: Counts how many times a vehicle started within a specific geofence.
This is based on accelerometer data detecting motion events:
- Filter:
vehicle/motion/shaking.
- Filter:
- Stopped: Counts how many times a vehicle stopped within a specific geofence.
This is also based on accelerometer data:
- Filter:
vehicle/motion/steady.
- Filter:
- Idling time: Displays the total time a vehicle spent idling within a
geofence. It is calculated as follows:
- Idling: The engine RPM is between 0 and a predefined idle RPM threshold (configurable per vehicle).
- Data source:
obd.rpm.value.
- Driving time: Indicates active driving time within the geofence. This is determined when the engine RPM is higher than the idle threshold.
- Parked: Shows the total time a vehicle was parked in a geofence. It is
calculated as:
- Parked time = total time spent in the geofence - (driving time + idling time).
- Distance: Displays the total distance driven within a specific geofence. This is calculated using GPS points logged while the vehicle was inside the geofence.
 Buy AutoPi device
 Compare all AutoPi devices