Create Loggers
Logging is one of the core features of the AutoPi Mini, allowing you to automatically record key data from your device for analysis, monitoring, or integration with other systems. In this guide, you’ll learn how to create and configure loggers for your AutoPi Mini, from understanding what are the available loggers, to setting up your own custom data collection workflows.
We’ll start with a step-by-step walkthrough on how to create, manage, and verify loggers directly from your AutoPi Cloud, followed by a quick overview of the available loggers and their specifications. Whether you’re setting up your first logger or fine-tuning advanced data capture, this guide will help you get started quickly and confidently.
Default Set of Mini Loggers
To ensure your AutoPi mini device works right out of the box, we preconfigure it with a set of commonly used loggers based on the most frequently requested data from our users. These default loggers are automatically installed on your device before delivery.
During the device registration process (covered in Step 2: Registration of the device of Getting started guide), you’ll be asked to enter your vehicle’s make, model, year, and type. Vehicle types include: Internal Combustion Engine (ICE), Battery Electric Vehicle (BEV), Plug-in Hybrid Electric Vehicle (PHEV) or Hybrid Electric Vehicle (HEV).
Once you select your vehicle type, the system automatically adjusts the logger configuration to better match your vehicle’s requirements. Any loggers that are updated during this process will be marked with a "modified" status. After the changes are successfully applied to your device, this status will disappear.

Once the default setup is complete, you can create additional custom loggers and sync them to your device. Instructions for creating and managing custom loggers can be found in the next section.
Creating a Mini Logger
Let's create a logger for your AutoPi Mini. Open up the AutoPi Mini device view and head over to the loggers page. Here, you will see a 'Create' and a 'Restore default' button on the left-hand side. Clicking on the 'Create' button will open a new window, that looks like the following screenshot:
The 'Restore default', as the name suggests, deletes the current loggers and applies default loggers based on your vehicle type.
Configure a Logger Fields
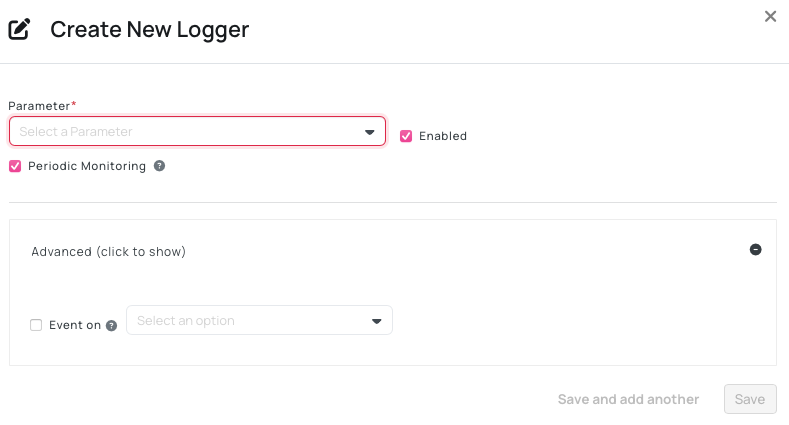
Let's look through the fields you can configure when creating a logger:
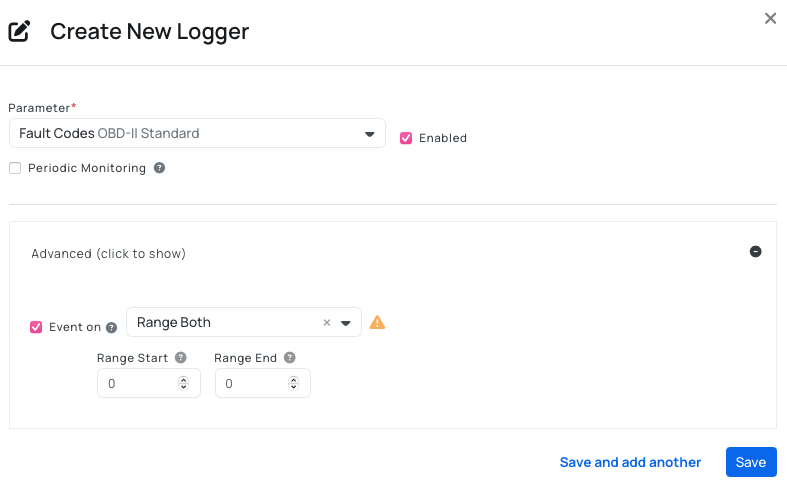
1. Parameter
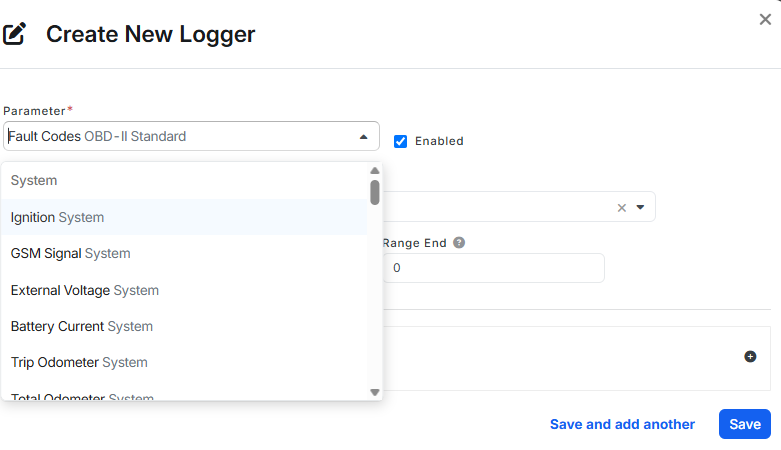
This is the parameter you would like to use. Select one of them from the dropdown menu. Note that, some parameter share the same name but can be distinguished by the group they belong to. Next to the parameter you can also modify if you want the logger to be Enabled or not by clicking the checkbox.
2. Periodic monitoring
By enabling this setting, this logger will be available in all messages from the AutoPi Mini. This means that it collects all data there is and eventually upload it. This setting is set up by default when you are creating a logger, as it functions the most efficiently when logging a data from the device.
![]()
3. Event on
This setting allows you to select an event that should trigger a record in the dropdown list. When selecting an event, you get presented with dropdown of options: Range Exit, Range Enter, Range Both, Hysteresis, Change and Delta Change. These options are a way to configure how that event behaves.
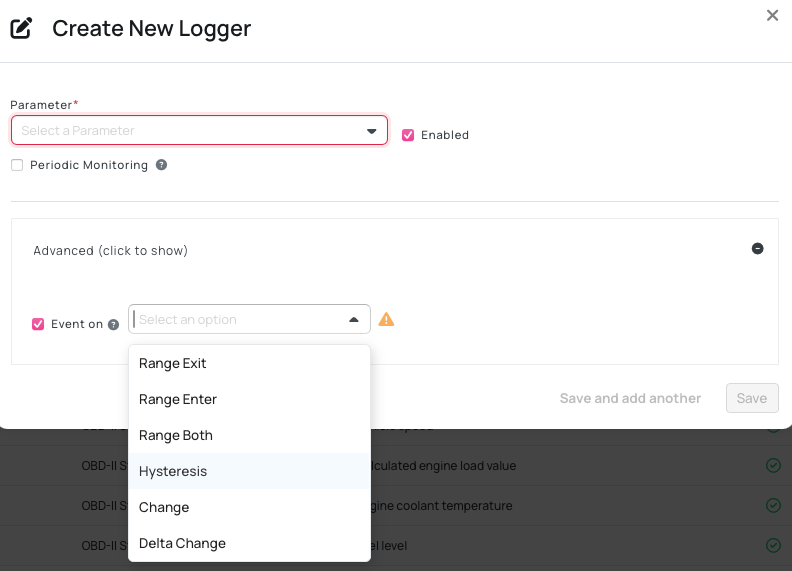
As an example, when selecting Range Both - contains a range start and range end field, which allows to configure the range that Range Both should generate records based on, this can also be seen in the following image:
When setting logger to trigger Event on set to Change, some of the loggers, like external voltage, are not static by nature — they can fluctuate frequently, even by small amounts. When these loggers are set to trigger on change, it can lead to a high volume of events being logged. This not only results in excessive data usage but can also prevent the device from entering sleep mode, as it’s constantly active processing these changes.
Switching these loggers to periodic monitoring helps manage this by reducing unnecessary events and allowing the device to function more efficiently.
Once you save the Mini Logger, you will see it appear in the Loggers page. Once the settings have been synchronized to your device, your device will start sending the newly created logger.
List of Available Loggers with Specifications
Compared to other AutoPi devices, the Mini only supports a predefined list of PID and CAN loggers (It also support listening on some system AutoPi Mini system changes, like the current sleep condition).
Down below, you can find the table of available loggers with specifications:
| Name | Description | Bytes | Type | Min | Max | Multiplier | Units |
|---|---|---|---|---|---|---|---|
| Accelerometer Axis X | X axis value | 2 | Signed | -8000 | 8000 | — | mG |
| Accelerometer Axis Y | Y axis value | 2 | Signed | -8000 | 8000 | — | mG |
| Accelerometer Axis Z | Z axis value | 2 | Signed | -8000 | 8000 | — | mG |
| Ambient air temperature | Ambient air temperature | 1 | Signed | -128 | 127 | — | °C |
| Battery Current | Battery current | 2 | Unsigned | 0 | 65535 | 0.001 | A |
| Battery Level | Battery capacity level | 1 | Unsigned | 0 | 100 | — | % |
| Battery Voltage | Battery voltage | 2 | Unsigned | 0 | 65535 | 0.001 | V |
| Engine RPM | Engine RPM | 2 | Unsigned | 0 | 16384 | — | rpm |
| Engine Oil Temperature | Engine oil temperature | 1 | Unsigned | 0 | 215 | — | °C |
| External Voltage | External voltage | 2 | Unsigned | 0 | 65535 | 0.001 | V |
| Fuel level | Fuel level | 1 | Unsigned | 0 | 100 | — | % |
| GSM Signal | Value in range 1-5 | 1 | Unsigned | 0 | 5 | — | — |
| Ignition | 0 - Ignition Off; 1 - Ignition On | 1 | Unsigned | 0 | 1 | — | — |
| Intake air temperature | Intake air temperature | 1 | Signed | -128 | 127 | — | °C |
| Network Type | 0 - 3G; 1 - GSM; 2 - 4G; 3 - LTE CAT M1; 4 - LTE CAT NB1; 99 - Unknown | 1 | Unsigned | 0 | 1 | — | — |
| Number of DTC | Number of DTC | 1 | Unsigned | 0 | 255 | — | — |
| OBD OEM Total Mileage | Total mileage (from OEM PID) | 4 | Unsigned | 0 | — | — | km |
| OBD Vehicle Speed | Vehicle speed | 1 | Unsigned | 0 | 255 | — | km/h |
| OEM Battery charge level | Represents battery charged level | 1 | Unsigned | 0 | 100 | — | % |
| OEM Battery State Of Health | Battery health percentage | 2 | Unsigned | 0 | 65535 | — | % |
| OEM Battery Temperature | Battery pack temperature | 2 | Signed | -32768 | 32767 | — | °C |
| OEM Distance Until Service | Distance till next service received by requesting PID | 4 | Unsigned | 0 | — | — | — |
| OEM HV Battery Current | Current used by high-voltage battery | 2 | Unsigned | 0 | 65535 | 0.1 | A |
| OEM HV Battery Max Cell Temperature | Maximum measured cell temperature | 2 | Signed | -32768 | 32768 | 0.1 | °C |
| OEM HV Battery Max Cell Voltage | Maximum battery cell voltage | 2 | Unsigned | 0 | 65535 | 0.1 | V |
| OEM HV Battery Max Energy | Maximum energy capacity | 2 | Unsigned | 0 | 65535 | 0.1 | kWh |
| OEM HV Battery Measured Energy | Measured current energy capacity | 2 | Unsigned | 0 | 65535 | 0.1 | kWh |
| OEM HV Battery Min Cell Temperature | The lowest measured cell temperature | 2 | Signed | -32768 | 32768 | 0.1 | °C |
| OEM HV Battery Min Cell Voltage | Minimum battery cell voltage | 2 | Unsigned | 0 | 65535 | 0.1 | V |
| OEM HV Battery Current | Current used by high-voltage battery | 2 | Signed | -3276 | 3276 | 0.1 | A |
| OEM HV Battery Voltage | High voltage battery voltage | 2 | Unsigned | 0 | 65535 | 0.1 | kWh |
| Total Odometer | Total Odometer value in meters | 4 | Unsigned | 0 | 2147483647 | — | |
| Trip Odometer | Trip odometer value | 4 | Unsigned | 0 | 2147483647 | — | m |
| VIN | Vehicle Identification Number | 17 | ASCII | 0 | — | — | — |
Link Your Loggers to Your Dashboard
For a widget to display data, it must be linked to the appropriate logger. If you add or edit loggers, you will also need to update the corresponding dashboard widgets.
Widgets can display data in several formats, including:
- Graphs
- Line charts
- State timelines
- Gauges ...
You can also configure widgets to show average, minimum, or maximum values depending on your needs.
After adjusting your widget settings:
- Click Save.
- Refresh the widget using the circle icon in the top-right corner.
If the data appears after refreshing, your configuration is correct. If you have just created a new logger, the device may need another vehicle trip before the required data is collected.
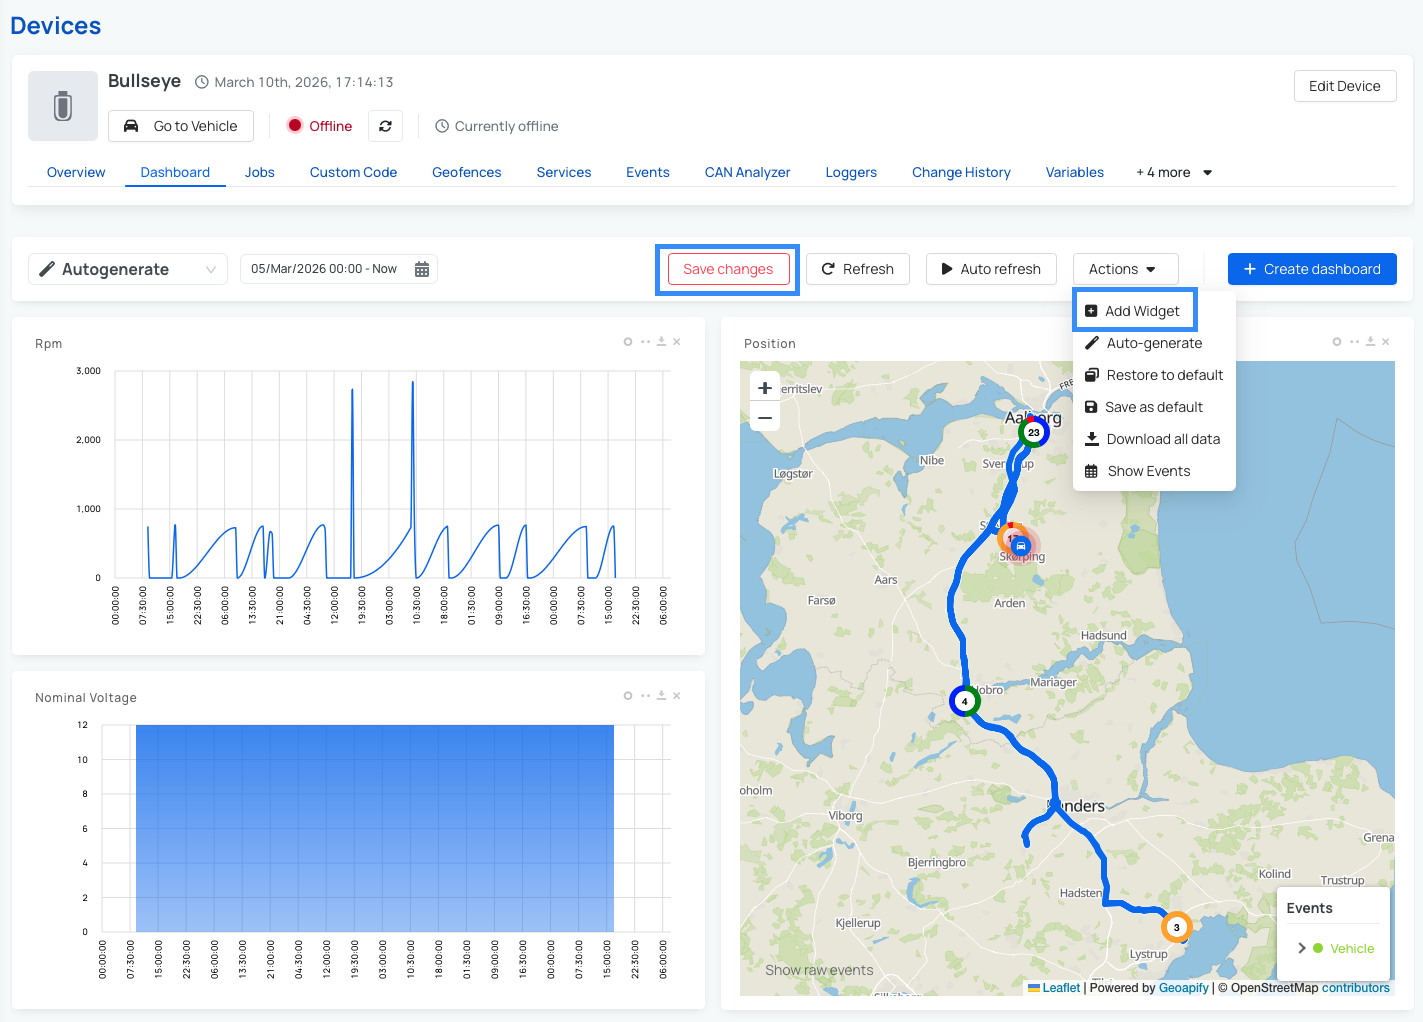
Add a Widget
To create a new widget:
- Navigate to Dashboard.
- Click the Actions button in the upper-right corner.
- Select Add widget.
- Fill out the required information.
- Click Save.
- Save your dashboard changes to apply the widget.
Note: For a more detailed explanation of widget configuration, see this guide: Configure the widget settings.
Note: When choosing the Field, the list only shows data that has already been received from the device. If the logger you are looking for is not in the list, the device may not be reading it. In this case, go to Loggers, enable the logger, or update its settings.
Note: A logger must be configured beforehand, otherwise the widget will not have any data to display.
Configure a Widget
To edit an existing widget:
- Navigate to Dashboard.
- Click the two-dot icon on the widget you want to update.
- Make your desired changes.
- Click Save.
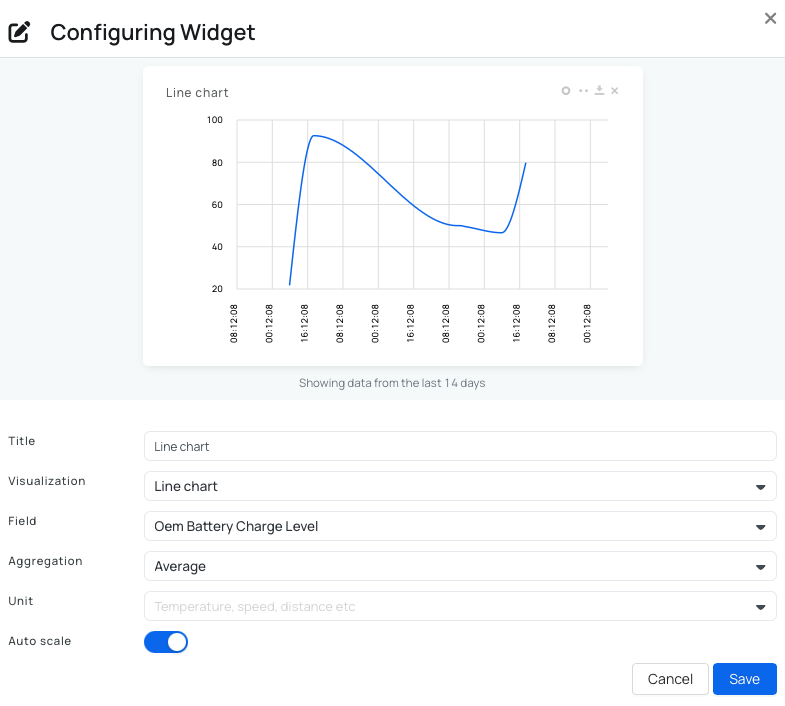
Note: Ensure the configuration, especially the Field section, matches the data being logged.
Auto-Generate Widgets
The Auto-generate feature allows you to quickly create widgets based on the data received from the device. This saves time compared to creating each widget manually. Auto-generated widgets are based on real data, and you can adjust them afterward if needed (for example changing aggregation or visualization).
How to use Auto-generate:
- Navigate to Dashboard.
- Click the Actions button in the upper-right corner.
- Select Auto-generate.
- Make any desired changes.
- Click Save.
Note: By default, there is usually an auto-generated dashboard created for your device, which you can find in the dashboard dropdown menu.
When you are satisfied with your dashboard configuration, remember to save your layout through Widget Actions to keep your settings for future sessions.
 Buy AutoPi device
 Compare all AutoPi devices
 Contact our sales team